So I had the most ridiculous craving for meatballs and pasta today. Highly usual as that is not a typical Lisa food to eat.
Perhaps it was Shena's talk of "Cloudy With a Chance of Meatballs" that sent me into a "I want to make meatballs and pasta" mode. Or maybe because during my Pharmacology lecture, instead of paying attention to the blah blah blahs of cholinergic or adrenic receptors and the Autonomic Nervous System, I was surfing the internet for recipes on making quinoa anything, pasta anything and shoes. (I justify by saying I read ahead for this lecture....)
Stumble upon a little Alton Brown and my favorite go-to recipe blogger, Elise, Simply Recipes 5 o'clock rolled around and class was done for the day and I was off to the grocery.
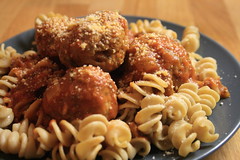
I fused both recipes together plus my own here, there's and maybes. I went with a mix of ground turkey and grass finished ground beef (90/10). I added chopped apples, which actually makes the meatballs super moist and adds the slightest hint of sweetness.
The recipe I am going to post makes a lot, so you might want to consider halving it. Even though I recognize I am only cooking for myself, I still haven't learned to portion for two and end up making enough food for the entire Dugger Family.
I didn't have time to make sauce from scratch and instead took 1 jar of regular pasta sauce and doctor-ed it up with some sauteed green bell peppers, onions, garlic and a can of stewed sliced tomatoes. You don't have to, but it gives me the false sense of gratification that I sort of "made my own sauce."
Since everything needs to be minced, if you have a handy chopper, that is a great tool to make this process go a bit more efficiently. The longest part of making these meatballs is the prep.
Turkey & Beef Meatballs
ingredients
1 lbs ground beef, 90% lean
1 lbs ground turkey
1 c minced cremini (baby bella) mushrooms (~1 package)
1 c. minced sweet yellow onion (~1/2 large onion)
1/2 c. minced carrot (~1 medium carrot)
1/2 c. minced apple
3 eggs
3 cloves minced garlic
2 tblspn chopped, fresh basil
1/2 c. grated parmesan cheese
1.25 c. bread crumbs (seasoned)
1 tsp chili flakes
1 tsp tarragon
2 tsp sea salt
2 tsp fresh, cracked pepper
2 tblspn olive oil
instructions
1. Preheat oven to 400F
2. Dump everything but the olive oil into a large bowl and start mixing it. I'm lazy, so I put everything into my stand mixer with the paddle attachment and mixed on low until everything is uniformly mixed, ~ 5 minutes
3. Form golf ball sized balls
4. Rub olive oil on each ball
5. Place on a cookie sheet
6. Bake for 25-30 min.
After you bake, they are technically done.... so you can proceed forward to the eating part but I did a little more...
7. To my doctored up sauce, I dumped in the meatballs and let them simmer in the pot for another 30 minutes.
8. Serve over your favorite pasta noodle!
yields ~40 golf ball sized meatballs
Tuesday, October 13, 2009

Sunday, October 4, 2009
Chai Chocolate Chip Cookies with Nuts
Once again, I start this blog post of "I haven't posted a recipe in a really long time...."
As most (I think) you know, I have relocated to the Windy City (aka Chicago) doing an accelerated 9 month MS program in Biotechnology at Rush University Medical Center. But enough about all of that, back to the important stuff. I ended up in an amazing apartment that has a kitchen that is awesome to cook and bake in! Gas stove and a giant island? Yeah! Plenty of space to knead dough and roast turkeys!
So while I should be studying for my first big pharmacology exam, I decided to bake some cookies instead. How studious of me! Baking is just an edible form of science, at least that's what I keep telling myself and fuels my neurons!
Adapted from this chocolate chip cookie recipe, I made modifications to fit the ingredients I had on hand. I added some Chai Latte Powder (from Trader Joe's) which adds a nice, very subtle chai spiciness to it and the addition of chopped mixed nuts with some dried cranberries adds great textural elements. The nuts and chai are completely optional. For the nuts, I used Trader Joe's "Simply the best Trek Mix".
Chai Chocolate Chip Cookies with Nuts
ingredients
1/3 c. organic sugar
1/3 c. light brown organic sugar
1/2 c. earth balance soy garden buttery spread (or just 1 stick of butter will be fine)
1 lrg egg, beaten
1/2 tsp vanilla extract
1 1/4 c. organic AP flour
1/2 tsp baking soda
1/3 tsp salt
1 scoop Trader Joe's Chai Latte mix (optional)
1 c. chocolate chips
1 cup of chopped mixed nuts (optional)
Instructions
Preheat oven to 375 degrees.
-Using a mixer (hand or stand), mix sugar, brown sugar, butter, vanilla and eggs in a large bowl until "fluffy".
-Mix in the rest of the ingredients, except for the chocolate chips and mixed nuts, until well mixed
- Mix in chocolate chip cookies & nuts until evenly distributed in the batter. NOTE: It won't be super stiff cookie dough.
-Drop tablespoon sized balls onto an ungreased cookie sheet.
-Bake 8-10 minutes until golden brown
-Let cool until firm, remove and finish cooling on wire rack.
Consume with lots of milk!!!
yields about 18 cookies in about 20 minutes

As most (I think) you know, I have relocated to the Windy City (aka Chicago) doing an accelerated 9 month MS program in Biotechnology at Rush University Medical Center. But enough about all of that, back to the important stuff. I ended up in an amazing apartment that has a kitchen that is awesome to cook and bake in! Gas stove and a giant island? Yeah! Plenty of space to knead dough and roast turkeys!
So while I should be studying for my first big pharmacology exam, I decided to bake some cookies instead. How studious of me! Baking is just an edible form of science, at least that's what I keep telling myself and fuels my neurons!
Adapted from this chocolate chip cookie recipe, I made modifications to fit the ingredients I had on hand. I added some Chai Latte Powder (from Trader Joe's) which adds a nice, very subtle chai spiciness to it and the addition of chopped mixed nuts with some dried cranberries adds great textural elements. The nuts and chai are completely optional. For the nuts, I used Trader Joe's "Simply the best Trek Mix".
Chai Chocolate Chip Cookies with Nuts
ingredients
1/3 c. organic sugar
1/3 c. light brown organic sugar
1/2 c. earth balance soy garden buttery spread (or just 1 stick of butter will be fine)
1 lrg egg, beaten
1/2 tsp vanilla extract
1 1/4 c. organic AP flour
1/2 tsp baking soda
1/3 tsp salt
1 scoop Trader Joe's Chai Latte mix (optional)
1 c. chocolate chips
1 cup of chopped mixed nuts (optional)
Instructions
Preheat oven to 375 degrees.
-Using a mixer (hand or stand), mix sugar, brown sugar, butter, vanilla and eggs in a large bowl until "fluffy".
-Mix in the rest of the ingredients, except for the chocolate chips and mixed nuts, until well mixed
- Mix in chocolate chip cookies & nuts until evenly distributed in the batter. NOTE: It won't be super stiff cookie dough.
-Drop tablespoon sized balls onto an ungreased cookie sheet.
-Bake 8-10 minutes until golden brown
-Let cool until firm, remove and finish cooling on wire rack.
Consume with lots of milk!!!
yields about 18 cookies in about 20 minutes
Friday, August 14, 2009
Mango Salsa
Wow! Amazing! Me blogging two recipes in one week? Absolutely unheard of!
One of the perks of my job is [generally] every Tuesday during the summer, the Muttart's put on Taco Tuesday. It's a great summer time activity that gets all the girls together along with Jeff and Matt (poor guys!) for lots of laughs and really good turkey tacos.
A food I developed quite the love for while living in Santa Barbara, CA was Mango Salsa. It seems to me that it is a lot less common salsa concoction here in the Northeast. One Taco Tuesday, I thought to myself, hmmm... why don't I make some? And so I did! It turned out to be quite the success with pretty positive feedback :]
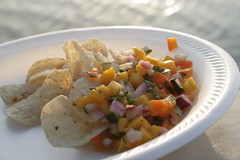
Although it is a salsa with fruit in it, it is not a fruity salsa by any means. In all actuality the mango adds a nice distinct yet subtle flavor and texture to the salsa, but it is still very salsa-ey and not a sweet tasting salsa by any means. I used jalapeño peppers in this salsa. If you ever wonder how to determine the "hotness" of a jalapeño pepper, this is a great method . Scientifically proven? No... but a genius culinary trick? Definitely.
Current photo of the salsa was two days after I made it, when I brought the extra to Amos Lake for us to enjoy on the boat while we took turns on the seadoo and wakeboard. Not going to lie when I say it was even better two days after I made it.
The recipe I am posting makes A LOT of salsa so you might want to consider halving the recipe. It also keeps for about 3-4 days before it gets mushy and gross. In general, I would say this is a simple and easy to make recipe. Perfect snack food for the summer!
Mango Salsa
ingredients
2 Mexican mango, ripe but not mushy
1 (colorful) bell pepper
1/2 red onion
1 cucumber (or 2 pickling cucumbers)
1 jalapeño, seeds and pith removed
1/4 cup chopped cilantro
1.5 tbs apple cider vinegar
1 lime (about 1.5-2 tbs of lime juice)
1 tspn fresh black pepper
1 tspn kosher salt
materials
knife
cutting board
bowl
1. peel the mangos. Cut into slices about 1/4 inches and dice.
2. dice bell pepper, red onion and cucumber. With the cucumber, you can leave the skin on or off. I prefer to leave the skin on as it adds a nice bit of textural element to the salsa.
3. mince the jalapeño. Don't touch your eyes! it might burn.
4. toss all the vegetables together along with the cilantro.
5. juice the lime right on top of the mixture followed by the vinegar, salt and pepper.
6. toss together until well mixed.
7. let flavors meld together for at least 30-45 minutes. The longer the mixture sits together, the more the flavors will develop.
makes about 3 cups? Just a guesstimate
One of the perks of my job is [generally] every Tuesday during the summer, the Muttart's put on Taco Tuesday. It's a great summer time activity that gets all the girls together along with Jeff and Matt (poor guys!) for lots of laughs and really good turkey tacos.
A food I developed quite the love for while living in Santa Barbara, CA was Mango Salsa. It seems to me that it is a lot less common salsa concoction here in the Northeast. One Taco Tuesday, I thought to myself, hmmm... why don't I make some? And so I did! It turned out to be quite the success with pretty positive feedback :]
Although it is a salsa with fruit in it, it is not a fruity salsa by any means. In all actuality the mango adds a nice distinct yet subtle flavor and texture to the salsa, but it is still very salsa-ey and not a sweet tasting salsa by any means. I used jalapeño peppers in this salsa. If you ever wonder how to determine the "hotness" of a jalapeño pepper, this is a great method . Scientifically proven? No... but a genius culinary trick? Definitely.
Current photo of the salsa was two days after I made it, when I brought the extra to Amos Lake for us to enjoy on the boat while we took turns on the seadoo and wakeboard. Not going to lie when I say it was even better two days after I made it.
The recipe I am posting makes A LOT of salsa so you might want to consider halving the recipe. It also keeps for about 3-4 days before it gets mushy and gross. In general, I would say this is a simple and easy to make recipe. Perfect snack food for the summer!
Mango Salsa
ingredients
2 Mexican mango, ripe but not mushy
1 (colorful) bell pepper
1/2 red onion
1 cucumber (or 2 pickling cucumbers)
1 jalapeño, seeds and pith removed
1/4 cup chopped cilantro
1.5 tbs apple cider vinegar
1 lime (about 1.5-2 tbs of lime juice)
1 tspn fresh black pepper
1 tspn kosher salt
materials
knife
cutting board
bowl
1. peel the mangos. Cut into slices about 1/4 inches and dice.
2. dice bell pepper, red onion and cucumber. With the cucumber, you can leave the skin on or off. I prefer to leave the skin on as it adds a nice bit of textural element to the salsa.
3. mince the jalapeño. Don't touch your eyes! it might burn.
4. toss all the vegetables together along with the cilantro.
5. juice the lime right on top of the mixture followed by the vinegar, salt and pepper.
6. toss together until well mixed.
7. let flavors meld together for at least 30-45 minutes. The longer the mixture sits together, the more the flavors will develop.
makes about 3 cups? Just a guesstimate
Monday, August 10, 2009
Lemongrass Ginger Grilled Chicken Wings
So much like my last post, I haven't posted a recipe in well over 1 month. With all the much needed summer fun going on, there's been a lot of time to cook but no time to blog!
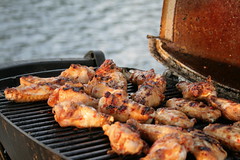
One favorite summer activity has been is going out on Amos Lake and doing "Sunset BBQs" on the boat. After an hour or two of wake boarding, a much needed grill session is always in order!
Changing things up from the usual burgers and hot dogs, I brought over some wings in this concocted marinate that I've modified from a recipe my mom frequently utilizes. So here is the closest anyone will ever get to getting one of my mom's top secret recipes!
I'm also dedicating this blog post to Cat N., a friend of mine from Santa Barbara. She was always my biggest fan! Thanks lady! :] Also, props to Emily B. for snagging my camera in the nick of time to snap a perfect picture of the wings grilling on the boat!
If I actually had to give this a name utilizing all the ingredients, it would be a VERY long title, so I'll just call these "Lemongrass Ginger Grilled Chicken Wings". Beats out any Asian Teriyaki chicken anytime if you ask me!
Lemongrass Ginger Grilled Chicken Wings
NOTE: Since this is a marinate that you are concocting and I never really measure (I did this time, but accidentally tossed out that paper with the approximations) there is quite a bit of flexibility so you really can't go wrong!
ingredients
4-5 lbs chicken wingettes (or you can just leave the wings whole, your choice)
.25 cup Oyster Sauce
3.5 tbsp Mushroom Soy Sauce (or dark soy sauce)
2.5 tbsp extra virgin olive oil
.25 cup lightly packed light brown sugar
1 tbsp spoon red chili flakes
4 large garlic cloves, minced
1 shallot, minced
1.5 tbsp minced Lemongrass
1 tbsp minced ginger
2 tsp fresh cracked black pepper
materials
1 gallon zip lock bag
1 mixing bowl
1 spoon
1. Taking all the ingredients (except for the chicken), mix them together in the bowl.
2. Put washed wings into the zip lock bag.
3. Dump marinate into bag.
4. Zip bag up
5. Proceed to massage and mix, coating the wings well.
6. Let marinate for at least 30 min, but the longer the better. Marinate overnight for best results.
7. Grill! As you grill, baste with excess marinate. Makes it extra tasty.
Makes enough wings for 5-6 people to enjoy on a party boat while sippin' on some Coronas with limes :] !
One favorite summer activity has been is going out on Amos Lake and doing "Sunset BBQs" on the boat. After an hour or two of wake boarding, a much needed grill session is always in order!
Changing things up from the usual burgers and hot dogs, I brought over some wings in this concocted marinate that I've modified from a recipe my mom frequently utilizes. So here is the closest anyone will ever get to getting one of my mom's top secret recipes!
I'm also dedicating this blog post to Cat N., a friend of mine from Santa Barbara. She was always my biggest fan! Thanks lady! :] Also, props to Emily B. for snagging my camera in the nick of time to snap a perfect picture of the wings grilling on the boat!
If I actually had to give this a name utilizing all the ingredients, it would be a VERY long title, so I'll just call these "Lemongrass Ginger Grilled Chicken Wings". Beats out any Asian Teriyaki chicken anytime if you ask me!
Lemongrass Ginger Grilled Chicken Wings
NOTE: Since this is a marinate that you are concocting and I never really measure (I did this time, but accidentally tossed out that paper with the approximations) there is quite a bit of flexibility so you really can't go wrong!
ingredients
4-5 lbs chicken wingettes (or you can just leave the wings whole, your choice)
.25 cup Oyster Sauce
3.5 tbsp Mushroom Soy Sauce (or dark soy sauce)
2.5 tbsp extra virgin olive oil
.25 cup lightly packed light brown sugar
1 tbsp spoon red chili flakes
4 large garlic cloves, minced
1 shallot, minced
1.5 tbsp minced Lemongrass
1 tbsp minced ginger
2 tsp fresh cracked black pepper
materials
1 gallon zip lock bag
1 mixing bowl
1 spoon
1. Taking all the ingredients (except for the chicken), mix them together in the bowl.
2. Put washed wings into the zip lock bag.
3. Dump marinate into bag.
4. Zip bag up
5. Proceed to massage and mix, coating the wings well.
6. Let marinate for at least 30 min, but the longer the better. Marinate overnight for best results.
7. Grill! As you grill, baste with excess marinate. Makes it extra tasty.
Makes enough wings for 5-6 people to enjoy on a party boat while sippin' on some Coronas with limes :] !
Wednesday, June 24, 2009
Giant Birthday Cupcake
So I realized I haven't posted in a while in general or really post a recipe at all. So let's remedy that.
June is the month of birthdays. One of my best friends, Kristina, was turning 23 (okay, so its come and gone by now). Anyhow, she is not an avid cake eater by any means unless it is Funfetti.
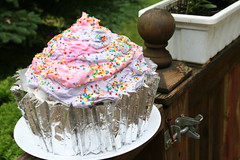
We both have fond memories of late night all nighters where I would bake us a pan of funfetti cake and we would eat that all night drinking cokes to stay awake to study. So in celebration of her 23rd birthday, I thought to make her the ultimate Funfetti Cupcake.
Here I used 2 boxes of Pilsbury Funfetti cupcake mix, 1 can of funfetti frosting, and topped it off with a homemade whipped cream cheese frosting.
You'll also want to make this delightful Whipped Cream Cheese Frosting first, so that you can let it set in the fridge
Giant Birthday Cupcake
Materials:
3 8 inch, round pans prepped with parchment paper
1 10-11 inch glass bowl (that can be used in the oven), coated with Pam or other non stick spray
Stand or Hand mixer
Aluminum Foil
Parchment paper
Ingredients:
2 boxes of cake mix (flavor of your choice)
ingredients to make the mix (eggs, water, oil)
1 can frosting (flavor of your choice)
Whipped Cream Cheese Frosting:
-1 pint (or 2 cups) of heavy whipping cream
-1/3 cup light agave nectar (if you do not have agave nectar, you can use 1/2 cup regular white sugar)
-1 tbl spoon vanilla extract
-1 8 oz package of cream cheese, softened
1. Into a stainless steel or copper bowl, cream together the agave nectar, vanilla extract and cream cheese until well mixed.
2. Turn your mixer on medium and slowly add the heavy cream. As the cream and sugar cheese mixture whippes together, it should start looking like whipped cream. Continue beating until stiff peaks form.
3. refrigerate for 1-2 hrs until stiff. This is especially important if you are using the agave nectar because the whipped cream is a little looser.
The cake:
1. Prepare the cake mix according to box directions. I make one box at a time to ensure that I do not over mix. It IS possible to over mix with box cake.
2. Fill each of the 8 inch round pan 1/2 of the way with batter. Pour remaining batter into the glass bowl.
3. Bake at 350F until tooth pick comes out clean for the 3 8inche pans. The glass bowl will take a bit longer. Once I take the rounds out, I turn down the temperature to 325F to prevent burning and bake until the toothpick comes out clean (almost 1 hr).
4. Cool on wire rack
5. While the cake is cooling, prepare the "foil wrapper". Roll out strips of parchment ~ 2.5 - 3 inches wide. Fold accordion style about 1/2 inch. Do the same with the aluminum foil
6. Layer the cakes and frost with can frosting. You can skip frosting the top because that is going to be topped with the whipped cream cheese frosting
7. Put a thick layer of canned frosting around the sides of the cake. This will help the parchment wrapper stick to the cake. Slowly wrap the folded parchment around the cake. Repeat with the foil.
8. Take your whipped cream cheese frosting out of the fridge and divide. Using food coloring (I used gel), lightly mix in the color of choice.
9. frost the top with color A, followed by color B. repeat until you have a "stacked" look.
10. Garnish with sprinkles or colored sugar if desired.
Serves 15
June is the month of birthdays. One of my best friends, Kristina, was turning 23 (okay, so its come and gone by now). Anyhow, she is not an avid cake eater by any means unless it is Funfetti.
We both have fond memories of late night all nighters where I would bake us a pan of funfetti cake and we would eat that all night drinking cokes to stay awake to study. So in celebration of her 23rd birthday, I thought to make her the ultimate Funfetti Cupcake.
Here I used 2 boxes of Pilsbury Funfetti cupcake mix, 1 can of funfetti frosting, and topped it off with a homemade whipped cream cheese frosting.
You'll also want to make this delightful Whipped Cream Cheese Frosting first, so that you can let it set in the fridge
Giant Birthday Cupcake
Materials:
3 8 inch, round pans prepped with parchment paper
1 10-11 inch glass bowl (that can be used in the oven), coated with Pam or other non stick spray
Stand or Hand mixer
Aluminum Foil
Parchment paper
Ingredients:
2 boxes of cake mix (flavor of your choice)
ingredients to make the mix (eggs, water, oil)
1 can frosting (flavor of your choice)
Whipped Cream Cheese Frosting:
-1 pint (or 2 cups) of heavy whipping cream
-1/3 cup light agave nectar (if you do not have agave nectar, you can use 1/2 cup regular white sugar)
-1 tbl spoon vanilla extract
-1 8 oz package of cream cheese, softened
1. Into a stainless steel or copper bowl, cream together the agave nectar, vanilla extract and cream cheese until well mixed.
2. Turn your mixer on medium and slowly add the heavy cream. As the cream and sugar cheese mixture whippes together, it should start looking like whipped cream. Continue beating until stiff peaks form.
3. refrigerate for 1-2 hrs until stiff. This is especially important if you are using the agave nectar because the whipped cream is a little looser.
The cake:
1. Prepare the cake mix according to box directions. I make one box at a time to ensure that I do not over mix. It IS possible to over mix with box cake.
2. Fill each of the 8 inch round pan 1/2 of the way with batter. Pour remaining batter into the glass bowl.
3. Bake at 350F until tooth pick comes out clean for the 3 8inche pans. The glass bowl will take a bit longer. Once I take the rounds out, I turn down the temperature to 325F to prevent burning and bake until the toothpick comes out clean (almost 1 hr).
4. Cool on wire rack
5. While the cake is cooling, prepare the "foil wrapper". Roll out strips of parchment ~ 2.5 - 3 inches wide. Fold accordion style about 1/2 inch. Do the same with the aluminum foil
6. Layer the cakes and frost with can frosting. You can skip frosting the top because that is going to be topped with the whipped cream cheese frosting
7. Put a thick layer of canned frosting around the sides of the cake. This will help the parchment wrapper stick to the cake. Slowly wrap the folded parchment around the cake. Repeat with the foil.
8. Take your whipped cream cheese frosting out of the fridge and divide. Using food coloring (I used gel), lightly mix in the color of choice.
9. frost the top with color A, followed by color B. repeat until you have a "stacked" look.
10. Garnish with sprinkles or colored sugar if desired.
Serves 15
Monday, May 25, 2009
Eggrolls
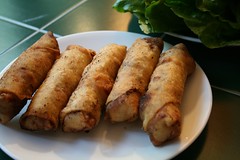
Most people on Memorial Day have foods that include hot dogs, hamburgers, potato salad, and watermelon. In my family, not so much. Our picnics usually consist of my mom making amazing steaks marinated in this sauce that I can't even explain, wings (some of you have had the pleasure of having) also marinated in amazingess, vietnamese style coleslaw, some kind of noodle soup spring rolls, and lettuce wraps.
Today, my mom's feature was Eggrolls. My mom made a filling of pork and shrimp, carrots, glass noodles, rehydrated mushrooms, onion, garlic, and of course fish sauce. I would post the recipe, but once again, she likes to be all top secret about it... or just not tell me the proportion for each ingredient.
Deep fried goodness, my mom's eggrolls are extremely satisfying. They can be eaten plain or wrapped in a roman lettuce leaf and dipped in a sweet fish sauce for a touch of tang and sweetness.
I swear, one day I will post one of my mom's amazing foods.
Monday, May 4, 2009
Mango Coconut Mint Panna Cotta
Shannon and I were headed to Boston for a weekend with Andrea. Of course there was going to be a dinner party! Andrea made amazing white potato pizza with scallions and caramelized red onion and rosemary and a great feta veggie pizza.
Since I was going to be a nice weekend, I thought I would try my hand at panna cotta, which translates to "cooked cream". Boy oh boy is it ever. I added a splash of peppermint extract to mine. I've gotten mixed reviews about the mint flavor, so it can be something that is up to your digression.
I also opted to leave mine in the ramekins, although they pop out rather easily. Ramekins are not a requirement. In the photo, I poured the panna cotta mixture into a small bowl we use for eating rice (about 1 cup bowl)! Martini glasses also make a great looking panna cotta.
Mango Coconut Mint Panna Cotta
2 medium sized mangos
4 tbl spn OJ
1 1/4 c coconut milk*
1 c. half and half
1/2 cup vanilla yogurt
1 c sugar
1 1/2 packet gelatin
1/4 tsp peppermint extract (optional)
*I left the can of coconut milk unshaken and scooped off the white coconut milk floating in the can
1. peel and chop the mango. Reserve 1/4 cup for garnish (optional) With an emulsifier or blender to make a mango purree. strain through a sieve to get all the stringy bits out
2. In a small bowl, mix the OJ and gelatin
3. in a stainless steel 1 quart pot, whisk together coconut milk, half and half and sugar on medium heat until very hot but not boiling.
4. in a separate bowl, mix together yogurt and mango puree
5. When the milk mixture is very hot, turn off heat and whisk in gelatin until the gelatin is dissolved followed by the mango puree and yogurt mixture.
6. whisk well together. If you have an emulsifier wand, you can even use that to make sure everything is well blended together
7. pour into ramekins.
8. chill for about 1 hour and sprinkle remaining mango. cover and chill over night!
makes about 12 1-cup ramekins 2/3 of the way full.
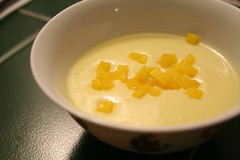
Since I was going to be a nice weekend, I thought I would try my hand at panna cotta, which translates to "cooked cream". Boy oh boy is it ever. I added a splash of peppermint extract to mine. I've gotten mixed reviews about the mint flavor, so it can be something that is up to your digression.
I also opted to leave mine in the ramekins, although they pop out rather easily. Ramekins are not a requirement. In the photo, I poured the panna cotta mixture into a small bowl we use for eating rice (about 1 cup bowl)! Martini glasses also make a great looking panna cotta.
Mango Coconut Mint Panna Cotta
2 medium sized mangos
4 tbl spn OJ
1 1/4 c coconut milk*
1 c. half and half
1/2 cup vanilla yogurt
1 c sugar
1 1/2 packet gelatin
1/4 tsp peppermint extract (optional)
*I left the can of coconut milk unshaken and scooped off the white coconut milk floating in the can
1. peel and chop the mango. Reserve 1/4 cup for garnish (optional) With an emulsifier or blender to make a mango purree. strain through a sieve to get all the stringy bits out
2. In a small bowl, mix the OJ and gelatin
3. in a stainless steel 1 quart pot, whisk together coconut milk, half and half and sugar on medium heat until very hot but not boiling.
4. in a separate bowl, mix together yogurt and mango puree
5. When the milk mixture is very hot, turn off heat and whisk in gelatin until the gelatin is dissolved followed by the mango puree and yogurt mixture.
6. whisk well together. If you have an emulsifier wand, you can even use that to make sure everything is well blended together
7. pour into ramekins.
8. chill for about 1 hour and sprinkle remaining mango. cover and chill over night!
makes about 12 1-cup ramekins 2/3 of the way full.
Subscribe to:
Posts (Atom)
