I have two amazing little twin cousins, Cindy&Nancy. Okay, they aren't little as in spunky 8 year old twins, they are actually the ripe age of 25 and going strong at a whole 4'& 10".
I love these two girls as if they are my own sisters. They are the funniest little things because they refuse to put anything green into their Pho (ie the cilantro, the thin sliced onions or the scallions) nor do they eat ground beef (or any ground meats in general). Nan also doesn't eat any vegetables. Apparently, Cindy’s gotten better and since the last time I saw her- has become practically a vegetarian.
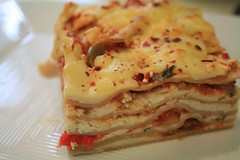
So what the heck am I supposed to make? In bulk, making lasagna is the easiest thing ever and I make lasagnas all the time. This was a special occasion though- seeing the Tiny Twins. Of course I am also putting off massive piles of school work as I consciously make the decision to do this: Make a whole lasagna from scratch.
That’s right everyone, I made the ricotta, the mozzarella, the sauce and the pasta noodles. All components are super easy to make. It’s just the sacrifice of time really. Both cheeses (see ricotta cheese entry) take less then 4 ingredients each to make, and can really be done in less then 1 hr. The sauce, once everything is in the pot (mine was just a basic peppers, onions, garlic and tomato), just needs time to simmer and the dough, once formed (whole wheat of course!), just needs to rest and be rolled out.
I would have loved to put layers of vegetables- zucchini, yellow squash, egg plant, etc etc and incorporated some kind of protein (meat sauce or Italian sausage?) but over all, it was possibly one of the tastiest lasagnas and biggest labors of food love I have thus far done in my cooking career.
Monday, January 25, 2010
Sunday, January 24, 2010
Orange Carrot Cake
It's the season of citrus! Oranges and the like are coming into full seasonal swing it seems like. I went to Trader's early last week and picked up a 4 lb bag of organic navel oranges. I ate half the bag in like two days. Then on Thursday afternoon, I went over to the Dominics, and there were even more organic navel oranges on sale! I couldn't resist getting another bag.
Then at Whole foods, they had bags of organic carrots on sale. Sure! why not? I like carrots, they are great to snack on.
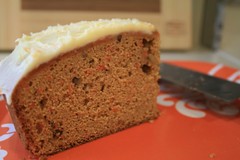
So with a plethora of oranges and carrots, whats a girl to do with it all??? I woke up Saturday morning, and it was like waking up with the best epiphany ever- duh! Orange Carrot Cake!! I also thought I would be miss fancy pants and infuse in some fresh ginger (does anyone know where my ground ginger went? I have no idea where I put it. It must have gone missing around the time of the gingerbread peoples) into the cake, but there wasn't enough of a kapow! of the ginger for the favor to be noticeable. In this recipe, if you want the ginger zing, you can easily at .33 tsp of ground ginger in there.
The frosting is a basic cream cheese frosting. Yes, I did try infusing a super saturated simple syrup solution with ginger and orange peels. The flavor was in the sugar but did not translate into the frosting. Sad! I did though manage to jazz up the frosting with about 3 tsp of orange zest.
It was a hit with my twin cousins, Cin&Nan. They pretty much ate the whole thing in a day. I think it might fall in more of a "bread" category, quite possibly due to me over mixing and especially when being consumed cold. Not too sweet, a little bit dense, and just a slight citrus flavor, I'd say it's pretty good.
NOTE: I zested the orange, and then squeeze out the juice to be used in the cake.
Orange Carrot Cake
ingredients
1 c butter (2 sticks), softened
2 c sugar
1 tsp cinnamon
.5 tsp nutmeg
.33 tsp ground ginger (optional)
1 tblsp orange zest (about 1 orange)
4 eggs
2 c grated carrots (about 3 carrots)
1 c walnuts, chopped
3 c flour
1.75 tsp b powder
1.25 tsp b soda
.5 tsp salt
.33 c orange juice
instructions
1.preheat oven to 350F, prepare three 9" round cake pans. Line with wax paper.
2. cream together butter and sugar
3. add in the spices and orange zest and mix thoroughly.
4. mix in 1 egg at a time, mixing the egg in well each time
5. mix in the carrots and walnuts
6. in a separate bowl, sift together flour, baking powder, baking soda, and salt
7. in three portions, add flour and OJ, alternating between flour and OJ, ending in flour. Mix well between additions.
8. divide into pans and bake for 30-45 min, until the cake tester comes out clean
Orange Zest Cream Cheese Frosting
ingredients
1 package cream cheese, @RT
2-3 c sifted powdered sugar
3 tsp orange zest
2-3 tblspn milk or yogurt
instructions
1. cream the cream cheese
2. in small portions, add in powdered sugar (I do about .25 c at a time)
3. cream together about 1.75 c powdered sugar and cheese
4. add dairy
5. add more powdered sugar until desired frosting consistency is reached
6. fold in orange zest
7. spread over orange carrot cake
yum!!!
Then at Whole foods, they had bags of organic carrots on sale. Sure! why not? I like carrots, they are great to snack on.
So with a plethora of oranges and carrots, whats a girl to do with it all??? I woke up Saturday morning, and it was like waking up with the best epiphany ever- duh! Orange Carrot Cake!! I also thought I would be miss fancy pants and infuse in some fresh ginger (does anyone know where my ground ginger went? I have no idea where I put it. It must have gone missing around the time of the gingerbread peoples) into the cake, but there wasn't enough of a kapow! of the ginger for the favor to be noticeable. In this recipe, if you want the ginger zing, you can easily at .33 tsp of ground ginger in there.
The frosting is a basic cream cheese frosting. Yes, I did try infusing a super saturated simple syrup solution with ginger and orange peels. The flavor was in the sugar but did not translate into the frosting. Sad! I did though manage to jazz up the frosting with about 3 tsp of orange zest.
It was a hit with my twin cousins, Cin&Nan. They pretty much ate the whole thing in a day. I think it might fall in more of a "bread" category, quite possibly due to me over mixing and especially when being consumed cold. Not too sweet, a little bit dense, and just a slight citrus flavor, I'd say it's pretty good.
NOTE: I zested the orange, and then squeeze out the juice to be used in the cake.
Orange Carrot Cake
ingredients
1 c butter (2 sticks), softened
2 c sugar
1 tsp cinnamon
.5 tsp nutmeg
.33 tsp ground ginger (optional)
1 tblsp orange zest (about 1 orange)
4 eggs
2 c grated carrots (about 3 carrots)
1 c walnuts, chopped
3 c flour
1.75 tsp b powder
1.25 tsp b soda
.5 tsp salt
.33 c orange juice
instructions
1.preheat oven to 350F, prepare three 9" round cake pans. Line with wax paper.
2. cream together butter and sugar
3. add in the spices and orange zest and mix thoroughly.
4. mix in 1 egg at a time, mixing the egg in well each time
5. mix in the carrots and walnuts
6. in a separate bowl, sift together flour, baking powder, baking soda, and salt
7. in three portions, add flour and OJ, alternating between flour and OJ, ending in flour. Mix well between additions.
8. divide into pans and bake for 30-45 min, until the cake tester comes out clean
Orange Zest Cream Cheese Frosting
ingredients
1 package cream cheese, @RT
2-3 c sifted powdered sugar
3 tsp orange zest
2-3 tblspn milk or yogurt
instructions
1. cream the cream cheese
2. in small portions, add in powdered sugar (I do about .25 c at a time)
3. cream together about 1.75 c powdered sugar and cheese
4. add dairy
5. add more powdered sugar until desired frosting consistency is reached
6. fold in orange zest
7. spread over orange carrot cake
yum!!!
Friday, January 22, 2010
Homemade Ricotta
Over the holiday break, my wonderful friend Andrea gave me the book "Animal, Vegetable, Miracle" by Barbara Kingsolver. I'm not going to lie, I'm a reader of Barbara Kingsolver. I've read "The Bean Trees" & "The Poisonwood Bible" and enjoyed both works immensely. Of course, those were fiction too, and what woman doesn't love reading a good fiction book?
"Animal, Vegetable, Miracle" is actually a nonfiction work, written in conjunction with her husband and daughter about transitioning from an urban life in Tuscon, AZ to Appalachia and farming to feed themselves for an entire year. It's a book that talks a lot about nutrition, the growing cycle throughout their one year, all the crap that goes into your everyday conventional food (Genetically Modified foods anyone?), and the carbon footprint you leave when you eat those raspberries in the middle of winter.
Reading it, along with just being/wanting to be more health and environmentally conscious, really wants me to just grow my own garden and have my own cow. Of course, living on the 16th floor of a high rise in the windiest city on earth.... not so conducive to gardening. I've also managed to go, for the most part, refined sugar free! It is so difficult, but I have to say, I'm feeling pretty good about it. I've pretty much eliminated it, but some days, I can't resist having a little bit of cake or chocolate.
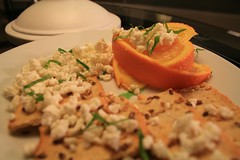
OK- so why the ricotta? I'm currently in preparations for making an entirely from scratch lasagna. Ricotta, Mozzarella, sauce, pasta noodle, all made by me. In "Animal, Vegetable, Miracle", Camille had a great 30 min mozzarella recipe, which I made once. First attempt = success, Second = fail. Ricotta, oh! what an amazing cheese. So inexpensive to make, and soo easy! I read various techniques and found a great recipe via Simply Recipes and changed it very slightly in directions to make a seemingly perfect ricotta for my lasagna.
The interesting part about all of this, is 1 gallon of whole milk was a mere $1.99 and the most expensive was the 1 quart of whole milk plain yogurt, which was $2.99. Yikes. Next time, I'll most likely go with the organic (across the board: whole foods, conventional grocery, Trader Joe's, it seems to be about $5.99 for a gallon of organic whole). But for trial and error purposes, and on the graduate student budget, $1.99 seems to be the way to do it.
NOTE: THIS IS VERY IMPORTANT when purchasing milk, purchase whole, pasteurized milk. NOT ultra pasteurized Ultra pasteurization is a process that allows milk to last longer so that it can be transported further. This process also breaks down the milk proteins much more such that it can never be reconstituted into any other dairy form. So, if you go for the organic, and don't pay attention to the pasteurization process, and end up with the ultra, then you can expect cheese= FAIL.
And for my photo set up, well I haven't made the lasagna yet, so I just had the cheese pose it up. Surprisingly, it was quite delish on naval orange slices with slivers of fresh basil.
Ricotta Cheese
ingredients
1 gallon, whole pasteurized milk
2 cups whole fat, plain yogurt
4 tsp white vinegar
2 tsp salt
instructions
1. in a heavy large pot, pour in milk and yogurt. mix well
2. set over medium low heat
3. in a small bowl, mix together the vinegar and salt
4. slowly stir in vinegar and salt mixture
5. let the solution slowly heat up to a boil. refrain from stirring all the time, but you can stir... just sparingly. It's really important to do this step slowly. Sure, it might take 20 or so minutes, but the outcome is worth the wait!!!
6. while the mixture is heating up, line a colander with cheese cloth
7. when the mixture reaches about 180F (it should be just about steaming), pay very close attention. As it comes to a rolling boil, curds should become visible. Let boil for about 2 minutes.
8. Take off heat and ladle out curds into cheese cloth.
9. Let drain to desired moisture content.
10. Enjoy in lasagna (like me), or make yourself some cannolis, or spread it over, warm over some fresh fruit. Yum!
makes about 4 cups
"Animal, Vegetable, Miracle" is actually a nonfiction work, written in conjunction with her husband and daughter about transitioning from an urban life in Tuscon, AZ to Appalachia and farming to feed themselves for an entire year. It's a book that talks a lot about nutrition, the growing cycle throughout their one year, all the crap that goes into your everyday conventional food (Genetically Modified foods anyone?), and the carbon footprint you leave when you eat those raspberries in the middle of winter.
Reading it, along with just being/wanting to be more health and environmentally conscious, really wants me to just grow my own garden and have my own cow. Of course, living on the 16th floor of a high rise in the windiest city on earth.... not so conducive to gardening. I've also managed to go, for the most part, refined sugar free! It is so difficult, but I have to say, I'm feeling pretty good about it. I've pretty much eliminated it, but some days, I can't resist having a little bit of cake or chocolate.
OK- so why the ricotta? I'm currently in preparations for making an entirely from scratch lasagna. Ricotta, Mozzarella, sauce, pasta noodle, all made by me. In "Animal, Vegetable, Miracle", Camille had a great 30 min mozzarella recipe, which I made once. First attempt = success, Second = fail. Ricotta, oh! what an amazing cheese. So inexpensive to make, and soo easy! I read various techniques and found a great recipe via Simply Recipes and changed it very slightly in directions to make a seemingly perfect ricotta for my lasagna.
The interesting part about all of this, is 1 gallon of whole milk was a mere $1.99 and the most expensive was the 1 quart of whole milk plain yogurt, which was $2.99. Yikes. Next time, I'll most likely go with the organic (across the board: whole foods, conventional grocery, Trader Joe's, it seems to be about $5.99 for a gallon of organic whole). But for trial and error purposes, and on the graduate student budget, $1.99 seems to be the way to do it.
NOTE: THIS IS VERY IMPORTANT when purchasing milk, purchase whole, pasteurized milk. NOT ultra pasteurized Ultra pasteurization is a process that allows milk to last longer so that it can be transported further. This process also breaks down the milk proteins much more such that it can never be reconstituted into any other dairy form. So, if you go for the organic, and don't pay attention to the pasteurization process, and end up with the ultra, then you can expect cheese= FAIL.
And for my photo set up, well I haven't made the lasagna yet, so I just had the cheese pose it up. Surprisingly, it was quite delish on naval orange slices with slivers of fresh basil.
Ricotta Cheese
ingredients
1 gallon, whole pasteurized milk
2 cups whole fat, plain yogurt
4 tsp white vinegar
2 tsp salt
instructions
1. in a heavy large pot, pour in milk and yogurt. mix well
2. set over medium low heat
3. in a small bowl, mix together the vinegar and salt
4. slowly stir in vinegar and salt mixture
5. let the solution slowly heat up to a boil. refrain from stirring all the time, but you can stir... just sparingly. It's really important to do this step slowly. Sure, it might take 20 or so minutes, but the outcome is worth the wait!!!
6. while the mixture is heating up, line a colander with cheese cloth
7. when the mixture reaches about 180F (it should be just about steaming), pay very close attention. As it comes to a rolling boil, curds should become visible. Let boil for about 2 minutes.
8. Take off heat and ladle out curds into cheese cloth.
9. Let drain to desired moisture content.
10. Enjoy in lasagna (like me), or make yourself some cannolis, or spread it over, warm over some fresh fruit. Yum!
makes about 4 cups
Tuesday, January 12, 2010
Beet & Sunchoke Salad with Balsamic Pomegranate Vinagrette
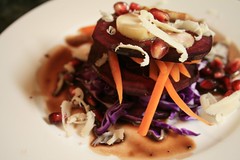
I’ve got a current obsession: Beets, Pomegranates & Sunchokes. All three are super tasty and yummy. As we all know, the darker the veggie or fruit, the higher the nutritional value. Beets and poms are well known to be super foods, high in vitamins and antioxidant power.
Fun fact about pomegranates: all poms have the same number of seeds in them. Okay, I really don’t know how true that is. I read it on the Trader Joe’s Elevator Chalkboard. Sunchokes? Now what are sunchokes. Technically, the are known as one of two things: California Sunchokes OR Jeruselum Artichokes. Now you are thinking, oh! Green! Large and sort of acorn shaped! Wrong!! It’s actually a tubar. The closest thing I can think of that it resembles would be ginger root.
Light tan in color, when peeled, yields a beautiful white flesh. It’s got the texture of a water chestnut, with a slightly nutty and artichoke flavor. Raw or cooked, its delicious with a lot of nutritional value- which I find surprising considering how it is just a white root- the polar opposite of the beet.
So what do I get when I get creative (okay, not really that creative)? A balsamic pomegranate vinaigrette drizzled over a pile of beet slices, juliened carrots, shredded red cabbage, a sprinkle of pomegranate seeds and topped off with sunchoke slices. Of course no salad is truly complete without some kind of cheese right? Currently also obsessed with Cypress Grove Farm , I had topped off the salad stack with shavings of “Midnight Moon”, which is their hard goat cheese. This hard goat cheese has little bits of lactic acid crystallization, which adds an amazing crunch and amazing flavor and texture to the salad.
The mixture of the goat cheese, tangy yet sweet balsamic pom vinagrette and the crunch of all those root vegetables, ohhhh yumm!!! I couldn’t feel any healthier. For photo sake, I sort of plated the salad as a stack but feel free to turn it into a chop salad and toss all together. You can bet that’s how I prepped my lunch salad for tomorrow.
NOTE that for how much I have as “ingredients” is really up to you, how ever much salad you want to make up. Dressing-wise, the recipe I am putting up makes enough for about 2 salads.
ALSO NOTE: If you really don’t have access to a fresh pom, or don’t want to bother with the seeds, you can easily use Pom juice, just using a 3:2 ratio of balsamic to pom juice, rather then the 1:1 because the Pom juice is concentrated.
ingredients
1 small beet, peeled
1 carrot, peeled & sliced into O’s (or jullianed)
1 large California Sunchoke
.33 c shredded red cabbage
.75 c. pomegranate seeds, divided into .5 c & .25 c
3 tblspn balsamic vinegar
3 tblspn olive oil
pinch of salt
pinch of pepper
instructions
1. taking the .5 c of pom seeds, in a small bowl, crush the seeds to get the juice. I found that the seeds put in a small bowl, crushed with the bottom of a pint glass worked best.
2. In a small sauce pan, put in the vinegar and about 3 tablespoons of pom juice and simmer until slightly reduced, let cool.
3. While your balsamic pom is cooling, arrange your veggies how you want.
4. Once the balsamic pom is cooled, emulsify (or whisk together) with the olive oil, salt and pepper.
5. Toss desired amount onto your salad.
6. Sprinkle on the cheese.
7. Yum!
Wednesday, January 6, 2010
Vanilla Coconut Cupcake
Ah, what can I say? I love cupcakes. We all know that.
We had a little pot luck with the graduate council that was themed international. Logic states that I should have made something Vietnamese, but whatever, I like making cupcakes. I haven't had time to concoct red bean, mung bean, whatever bean with coconut cupcakes possibilities, so I did the next best thing: VANILLA COCONUT. YUM.
Jenny made the BEST Glass noodle chicken stir fry something or another. I seriously could NOT stop eating it. oink oink.
This recipe is super simple and isn't composed of anything fancy except for maybe the coconut milk. In a well stocked kitchen, most ingredients I'm sure you'll have handy and if you don't have the coconut milk, you can use regular milk.... you'll just end up with Vanilla Cupcakes.
I'm blogging this mainly because Mimi gave the cupcakes the OK. Its gotta be half decent if Mimi gives the seal of approval right? Feed back seemed especially positive regarding the frosting, which is nothing more then a simple egg white + sugar + cream of tartar frosting. The frosting was almost of a fluff like consistency: sugary, sticky, gooey goodness! If you have ever had royal icing and wish that there was a light and fluffy form of it, well, this would be it!
The cake itself is light-ish, and has a very subtle coconut flavor. It's also super time sensitive. I accidentally stopped paying attention and left them in about 1 or 2 minutes too long and they came out slightly dry, so as soon as that top looks ready and the toothpick comes out clean, take those puppies OUT!
Vanilla Coconut Cupcakes
ingredients
for cake
1 stick (8 tblspn) butter softened
1 c white sugar
3 lrg eggs
2.5c AP flour
1.5 tsp b. powder
.5 tsp b. soda
.5 tsp salt
.5 c coconut milk (or whole milk)
.5 c vegetable oil
1.5 tsp vanilla extract
1 c coconut shavings, optional
instructions
1. preheat oven to 350F, line cupcake pans with paper liners
2. in your mixer, beat together butter and sugar, about 5 minutes, until light and fluffy
3. in a separate bowl, whisk together all dry ingredients
4. in another bowl, mix together all wet ingredients, except for the eggs
4. into the mixer, beat in one egg at a time, beating well after each egg. Don't forget to scrap down the sides between egg addition.
5. in an alternating fashion (and mixing well between additions) add 1/3 dry ingredients, 1/2 wet ingredients, 1/3 dry ingredients, rest of wet ingredients, rest of dry ingredients (starting and ending with dry ingredients).
6. Your batter should be light, fluffy and quite airy at this point. Spoon in to pans until 2/3rds full.
7. Bake 15-18 minutes until slightly golden brown and cake tester (ie toothpick) comes out clean.
8. let cool on wire rack, then proceed to ice with Icing and top off with coconut shavings if desired.
makes about 24 regular sized cupcakes or 12 regular ones and 6 big ones
Vanilla Sugar Icing
ingredients
2 lrg egg whites
1 c white sugar
2 tblspn light corn syrup
2 tblspn water
.25 tsp cream of tartar
1.5 tsp vanilla extract
instructions
1. fill a pot with about 1 inch of water and heat until simmering.
2. in a heat tolerant bowl, whisk together all ingredients. (see end note)
3. place bowl over pot (but don't let it touch the water!) and whisk until the mixture temperature reaches 160F, this will ensure all bacteria have been killed off. Using a hand mixer, beat over the simmering water until you get a nice and fluffy frosting, voila! finished!
NOTE If you are like me, and do not have a hand mixer but instead a stand mixer (I know, that is reverse of how it should be), you can heat up your mixture in your mixer bowl and as long as it reaches the 160F for 15-20 seconds, you can remove from the heat and beat your sugar mixture into frosting that way.
yields about 3.5 cups frosting
Sunday, January 3, 2010
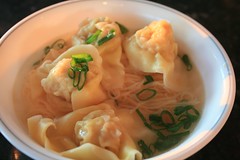
Wonton Soup II
Per usual, my blogs have been few and far between. I really have no excuse for December's lack of blogging, except for perhaps two week's worth of finals. Psh, I know. Such an excuse for the weak!
So hopefully everyone had a happy and safe holiday with their families and loved ones! I was tucked away in the woods of Preston, CT- enjoying all the comforts of home for a good 12 days. There, I indulged in all the foods that my mom likes to stock pile when my sister and I are home. I had aspirations to do a blog or two when I was home, but the fact that my mom was there, cooking FOR me... well, I just was enjoying being spoiled too much to be bothered to concoct my own recipes.
All in all, I had a great, great time in CT. Of course, all good things must come to an end.... that is for better things! The rest of my winter break was spent in Colorado enjoying high altitude, fresh air, and especially good company. I had my first experience snowboarding in CO and lets just say, when forced to go down runs called "The Moz", uhh, there is a lot of shrieking before many impacts that follow the shriek. But, the upside is, I didn't break anything, no tripping in parking lots, and make it back to Chicago in one piece for the most part.
Okay, so after a quick recap of my life, lets get back to why I am blogging about Wonton soup. I know, I've blogged it before... but this time, there is an actual recipe!! Having a craving for a good meal made with my own hands, I thought I would give the wonton soup a shot. Leaving CO, where 38F feels AWESOME because of the dry desert air, to come back to the city where the temp is 3F WITHOUT the windchill, that just means one thing: SOUP.
I made a chicken/shrimp stock (I will not blog because it came out part disastrous, part really good) as the soup base. But for this blog, I'll only post how to do the filling and wontons. To make a reasonable broth, just heat up some chicken stock and add a splash or two of fish sauce.
Wonton, as my mom makes it, is a combination of shrimp and pork ground together in a food processor. Since I am always cooking for myself, portion control is a HUGE problem. This time intensive soup is not meant to make just one serving. For the pork, I bought a small chunk of pork belly from Whole Foods and about .5 lbs 50-60 cnt head on shrimp, which I then proceeded to devein, peel and behead to toss the shells and shrimp head into the stock pot.
I think the most difficult part will be finding good wonton wrappers (who likes thick wonton wrappers? certainly not I!) and good, fresh wonton noodle. You'll want to hit your local asian grocery for that. Lucky for me, I keep that stuff handy in the freezer. The sauces and spices in the filling should be easily found in the international food aisle, but if you are already at the asian grocery getting your wonton wrappers and noodles, you might want to pick up the fish sauce and oyster sauce there too. Be warned though, Fish sauce only comes in 1 litre bottles.
FISH SAUCE? ewwwwww you might say. But I would take that back if I were you. I bet if you ever ate anything asian, there's most likely at least a splash of fish sauce, if not more. It's sort of the magic sauce that makes everything really tasty.
You'll also note that I did not use any salt in the filling. The fish sauce IS the salt seasoning for the filling, so you won't want to add any additional salt.
I sort of gauged my filling seasoning by smell. Kind of weird, I know. But you sort of just KNOW when it is seasoned just right via smell, plus I am a very scent oriented person so, it works for me. Also, something about taste testing raw pork and shrimp... Trichinosis anyone?
Wonton Dumplings
ingredients
~.5 lbs uncooked shrimp, you can just get already peeled, beheaded ones. or beheaded, deveined and then peel them
~.5 lbs pork belly (also known as pork side), cut into .5inch chunks
1 small shallot, minced
2 garlic cloves, minced
1 tablespoon fish sauce
2 teaspoon oyster sauce
1 teaspoon sesame seed oil
2 teaspoon oil oil
1 teaspoon fresh ground pepper
1 package wonton wrappers
1 egg, cracked into a bowl
instructions
1. into your food processor, grind up the pork 2-3 minutes, then toss in the shrimp. Grind for an additional 1-2 minutes. You'll want to be able to see medium chunks of shrimp
2. put in garlic, shallots, and spices/sauces. Grind for 1-2 minutes. Shrimp chunks should be small.
3. put filling into a bowl, and mix with a spoon until all spices/sauces have bee evenly distributed.
4. Taking your wonton wrapper, wet 1/2 of square, diagonally with the egg.
5. Place about 1 tsp of filling into the center of the wrapper.
6. Fold the wrapper along the diagonal so that the egg wetted half meets the dry half. taking the two further corners of the triangle, pull them together to make the little wonton pocket. pinch together with a little egg wash to stick it together.
7. dunk into a pot of boiling water for 6-8 minutes, until floating.
8. enjoy with wonton noodles in a broth or by themselves dipped in some soy sauce!
makes about 3 dozen wontons
Subscribe to:
Posts (Atom)
