One of my favorite ALL TIME DESSERTS is The Chocolate Mousse. Light, rich, chocolatey goodness. On a recent trip to the international market I came across an entire SECTION devoted to Mexican Sour Cream. What could be so special and unique about this said Mexican Sour Cream to have an entire dairy case devoted to it?
So I bought a small container and went home and tried to use it as dip. UTTER FAILURE. Turns out, Mexican sour cream is hardly like sour cream at all. It's much runnier and has only the slightest big of tang of what you would expect of sour cream. Instead, its more like an ultra thick, ultra rich heavy whipping cream similar to a creme fraiche. Apparently, chefs love this stuff because it holds up for days, rather then collapsing after a few hours, which frequently happens with heavy whipping cream whipped desserts.
I concocted a pretty simple to do Chocolate Mousse using said Mexican Sour Cream. The result: a very light, yet dense mousse. To me, it's almost like a really light ice cream, sans the frozen component. Rich, smooth, its an over all tasty success!
After making this, I would also think that crumbled Oreo Cookies would be a really good addition to it as a topping or layers (remember those chocolate pudding earth cups you got as a kid?)
Chocolate mousse
ingredients
1.33 c mexican sour cream
.5 c heavy whipping cream, divided
2 c semi sweet chocolate chips
3 oz strong coffee or espresso
1 tblspn dark rum
1 tblspn Godiva liquor (optional)
3 tblspn butter
1 tsp granulated gelatin
instructions
1. put your mixing bowl and beaters (or whisk attachment) into the freezer
2. in a double boiler mechanism, bring about 1.5 - 2" of water to just below a simmer
3. in a small heat proof measuring cup, measure out .25c heavy whipping cream. sprinkle on the gelatin into the measuring cup
4. in large, heat proof mixing bowl (that can be comfortable over your pot of just below simmering water), put in the chips, coffee, rum, liquor, and butter
5. with a whisk, mix until just about all the chips have melted, at this point remove from heat and continue on whisking
6. cool by occasional stirring, until just warm to the touch.
7. turn the heat off the double boiler and place your mixing cup (with the gelatin/cream mixture) itself into the water. stir until it is throughly heated, warm to the touch
8. pour the cream/gelatin mixture into chocolate mixture and stir
9. remove bowl and beaters from freezer. put in sour cream and remaining heavy cream. beat until peaks form
10. stir in .25 of the whipped cream mixture into the chocolate mixture. fold in remaining whipped cream in 3rds of what remains (add whipped cream mixture three times)
11. DO NOT OVER MIX OR ELSE YOUR MOUSSE GOES SPLAT! It's okay if there will be white streaks in the chocolate mixture
12. spoon into desired containers: ramekins, martini glasses, one 9x9 baking pan
13. chill for 1 hr, consume with happiness!
makes uh... well, depends on what you use as a container. I ended up pouring into 1 large martini glass and the rest into a 9x9 pan, making a layer of mousse about 1.5" thick.
Saturday, May 22, 2010

Friday, May 21, 2010
A Breakfast Sandwich with Perfectly Scrambled Eggs
As some of you may or may not know, I have the most insatiable love for breakfast foods. The only exception would be pancakes. I abhor pancakes. One bite and I am so done.
Another fun fact about me, I used to work for a breakfast deli, both as The Coffee Girl (yeah, thats right, I walked around pouring coffee and bussing tables) and then somehow got sucked into being the occasional Kitchen Staff. There, I perfected the art of buttering toast, plating out food, and scrambling eggs (yes, all of the above really IS an art). If you've never heard of Herb's Deli and you're from Southeastern CT, you ought to try it at some point or another. Delightful breakfast food and personally, I really like the corned beef, which Herb makes in house. Tasty.
Lately, I've been loving The Sandwich. Last night, I made a tasty seared open face skirt steak sandwich, where the sauteed mushroom and caramelized onions came from. So this recipe is more about perfecting the art of making the perfect scrambled eggs for your sandwich. Anyone can put together a breakfast sandwich, but what truly makes a good breakfast sandwich is the egg you have as the protein. So I won't tell you how to put your english in the toaster (also, english muffins take a long time to toast, so to get a nice golden toast, put your toaster on high) or how to saute your mushrooms or how to make the onions, but instead focus on the eggs. If you do this right, you really don't need more then one egg per sandwich but since this wouldn't be filling enough for me, I always scramble two.
Perfectly Scrambled Eggs
ingredients
olive oil
2 eggs
1 tblspn milk
1. Prepare your pan. In a heavy, non stick pan turn the heat on high and put in enough olive oil to coat the bottom
2. In a medium bowl, crack two eggs and add the milk. beat the eggs with a fork. I mean, BEAT THE EGGS. beat the eggs until when you lift the mixture with the fork, there isn't this eggy dangling mixture from your fork
3. check your pan, is it hot enough? you can always test by putting a drop of egg on the pan and if it cooks right away, then your pan is ready. turn the heat down to medium high
4. with your Non Dominant Hand, hold your bowl with the egg mixture. In the other, the fork.
5. Pour the mixture into the middle of the pan, and as you pour, with your fork, move in a circular direction
6. the eggs should be instantly cooking and as you move in a circle, it should allow more even cooking. As the eggs cook, I like to lift folds of cooked egg and let liquid egg flow underneath.
7. Just before it seems that everything is cooked all the way, TURN OFF THE HEAT. The residual heat from the pan will cook the eggs the rest of the way.
8. You'll note that you might not have pieces of eggs but instead one huge scrambled egg. You can scramble, scramble it but I always find it easier to eat (in a sandwich) as one piece of scrambled egg.
9. If you did it right, you're volume should be pretty big, and you'll only need half of what is in your pan to fit on the english.
nom nom nom.
Monday, April 26, 2010
Cranberry Blueberry Scones
Hello Long, Lost, Unlurved & Abandoned Blog!
I have returned after a little spring hiatus. The city has had much to offer me yet so little time to embrace it all! I've spent a lot of time in and around the Midwest, visiting Nan in Indy, visiting the Horses at the famous Keeneland Race Track, enjoying the company of my classmates and truly embracing what is the beautiful City of Chicago.
And once again, I am blogging when I should be studying for my pharmacology exam… Lets do a quick recap of my life though. Leaving off? I don't even recall. Spring Quarter has been the best so far, little structure, lots of labs and having to deal with courses like Stats and "Writing", what ever that means. It's been great. I'm starting to really enjoy Chicago now that it's warming up…
Everyone keeps telling me to hold out for summer, but I don't think I can! I've got bigger, better plans! If you haven't heard the buzz yet, yes, thats right, I'm moving to Colorado!!! With a plethora of biking, hiking, snowboarding, love, and happiness all around, why would I NOT want to move there? Oh, but Lisa, have you found a job yet? Of course not! Sure, I have been trying since February but to no avail. Maybe prospects will be better once I move? But then Lisa, what ever will you do? Easy! Exactly what I have been doing, studying, baking, and just keeping it real and happy and harmonious!
So on that note, whats more happy and harmonious then just starting off your morning with a tasty scone or having afternoon tea and a scone? Absolutely nothing except for a baby walrus (adorable creatures!) Rummaging through my freezer, I discovered a bag of cranberries lurking from Thanksgiving. Not even a touch of freezer burn on them, perf! Low and behold, right next to it, a forgotten bag of blueberries!! Magical, cranberry & blueberry scones!!
The only thing I did different was use vanilla keifer rather then milk or cream. Its a nice low fat alternative plus has probiotic elements (which are all killed off in the 400F oven) but since it is between yoghurt and milk, it adds a nice sweet tang to the scones. Tasty!
Cranberry & Blueberry Scones
ingredients
2c AP
.25 c granulated, white sugar
1.5 tsp b. powder
1/8 tsp salt
6 tblspn unsalted butter, chilled, cubed
1 c frozen cranberries
.25 c frozen blue berries
1 leg egg, beaten
1 tsp vanilla
.66 c vanilla kiefer (or .5c milk/cream)
instructions
1. preheat oven, 400F
2. in your mixer, with paddle attachment, mix first four ingredients
3. mix in butter until a crumbly mixture forms
4. in another bowl, beat together wet ingredients
5. add to dry mixture, mix on medium-low until just incorporated. if it is a bit too wet, add more flour. DO NOT OVER MIX
6. knead 4-5 times (dust with flour) pat out into circle that is 1.5 inches thick
7. cut into 8 wedges
8. place onto cookie sheet, bake 20-25 minutes until golden brown and toothpick comes out clean.
makes 8 wedges. Enjoy with some Earl Grey Tea and happy company
Friday, March 19, 2010
Red Velvet Cupcakes
Ahhh, springtime is wonderful- it marks warmth, sunshine and LOTS OF BIRTHDAYS!
Today is my friend Mimi's birthday. So Red Velvet cake it was. The funny part of red velvet cake though, is that its only red because the massive amount of food coloring in it. This particular recipe, adapted from Paula Deen, doesn't use a lot of cocoa powder, so you can easily make this Purple Velvet (if you were Shena) or Blue Velvet or what ever color velvet you wanted it to be. Really, its nothing more then a glorified vanilla cupcake if you ask me.
But tasty nonetheless. I made pretty much a standard cream cheese frosting, but I also added Madagascar vanilla bean. Adds a slight crunch and a lovely aromatic flavor of vanilla. Yum.
Also fun and optional is a fun sugar crystal rim.
Happy Birthday Mimi!
Red Velvet Cupcakes with Vanilla Bean Cream Cheese
ingredients
2.5 c ap flour
1.5 c granulated white sugar
1 tsp b soda
1 tsp salt
1 tblsp cocoa powder
1.5 c vegetable oil
1 c buttermilk, room temperature
2 large eggs, room temperature
1 tblspn red food coloring (1 bottle) or 1 big scoop of gel food coloring
1 tsp white distilled vinegar
1 tsp vanilla extract
frosting
1 stick butter, RT
1 8oz package cream cheese, RT
.5 tsp vanilla extract
1 tsp milk
2-3 c sifted powder sugar
seeds scrapped out of .5 vanilla bean (optional)
instructions
1. preheat oven to 350F, line cupcake pan with paper lines
2. in your mixer, mix together all wet ingredients for cake
3. while wet ingredients are mixing, sift together all dry ingredients
4. when all wet ingredients are well incorporated, mix in 1/2 of the dry ingredients at a time until all dry ingredients have been mixed in
5. fill cupcake pans 2/3 of the way, bake for 10-15 minutes until cake tester comes out clean.
6. let cool on wire rack
while your cupcakes are baking..... make the frosting!
7. cream together your butter and cream cheese. This should take about 3 or 4 minutes
8. add the vanilla bean, vanilla extract and milk
8. add powdered sugar until you've reached your desired consistency
9. spread over cooled cupcakes
yield = 18 ish cupcakes, with enough frosting for all 18
Wednesday, March 17, 2010
Magical Veggie Pizza
Oh, how I have been craving a perfect slice of NY cheese pizza the size of my head. Unfortunately, once you head west and end up in Chicago, well you get something called "deep dish", which to me is more like pizza casserole and indigestion.
Anyhow, I'm headed off to spring break in mere days and have to consume what ever produce I have left, ASAP so I've been making veggie everything. Okay- so I've only tried to make pizza once before, a long long time ago and I remember it coming out distinctly terrible. Besides, with this business of studying, I really don't have time to make/roll out the dough nor do I own a pizza stone. SHORT CUT: BUY A FROZEN CHEESE PIZZA!!! So for $3.99 at Trader Joe's I bought myself a frozen pizza. But how to piazza it up?? Simple additions of some veggies here and there and voila, 8 dollars later, you've got yourself a pretty much organic veggie pizza of magical proportions. I'd say it straddles the line of homemade if you ask me!
I roasted the pepper (instructions to follow), sauteed the spinach in lots of garlic, sliced up a tomato and and mushrooms, followed baking instructions plus 5 minutes and voila, 20 minutes later, pizzzzaaa!!!
If you are like me and pretty much cook for yourself or don't have a well stocked fridge, I'd raid either the salad bar or loose veggies section to get your veggies to sprinkle on top.
Magical Veggie Pizza
ingredients
1 frozen pizza
1 on the vine ripe tomato (sliced, quartered or halved)
3 crimini mushrooms, sliced
1 bell pepper (i used a yellow one)
2 cups of spinach
1 tsp garlic, minced
1 tblspn olive oil
salt and pepper
instructions
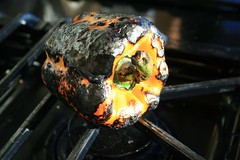
1. Roast your bell pepper. You must have a gas stove, or else I don't really know what else to tell you except google "electric stove, roasting bell peppers". Place your bell pepper on the stove, heat high. Let each side char and rotate until all sides are charred. It should look something like this.

Also, use metal tongs. You don't want to melt your plastic ones.
2. Place your piping hot pepper into a small bowl and place a dish towel over it to let it steam itself. This will help make removing the skin easier.
3. While the pepper is cooling, saute your spinach and garlic together in some olive oil.
4. Once the pepper has cooled enough to handle (5-10 minutes), you should be able to easily rub off the skin. If you can't well, then you didn't char it enough now did you? Don't worry about not being able to remove all the charred bits. As tempting as it might be, DO NOT RUN THE PEPPER UNDER THE SINK. You'll wash away the flavor.
4. Once its nicely peeled, jullianne the pepper.
5. Preheat your oven to 425F (or what ever the pizza box calls for)
6. While your oven preheats, decorate your pizza with your veggie ingredients
7. Bake as instructed, plus 5-10 minutes depending on your pizza size.
8. Let cool, then cut and serve! Remember, hot cheese is taste bud searing cheese.
Serves as many people as the pizza size you bought.

Anyhow, I'm headed off to spring break in mere days and have to consume what ever produce I have left, ASAP so I've been making veggie everything. Okay- so I've only tried to make pizza once before, a long long time ago and I remember it coming out distinctly terrible. Besides, with this business of studying, I really don't have time to make/roll out the dough nor do I own a pizza stone. SHORT CUT: BUY A FROZEN CHEESE PIZZA!!! So for $3.99 at Trader Joe's I bought myself a frozen pizza. But how to piazza it up?? Simple additions of some veggies here and there and voila, 8 dollars later, you've got yourself a pretty much organic veggie pizza of magical proportions. I'd say it straddles the line of homemade if you ask me!
I roasted the pepper (instructions to follow), sauteed the spinach in lots of garlic, sliced up a tomato and and mushrooms, followed baking instructions plus 5 minutes and voila, 20 minutes later, pizzzzaaa!!!
If you are like me and pretty much cook for yourself or don't have a well stocked fridge, I'd raid either the salad bar or loose veggies section to get your veggies to sprinkle on top.
Magical Veggie Pizza
ingredients
1 frozen pizza
1 on the vine ripe tomato (sliced, quartered or halved)
3 crimini mushrooms, sliced
1 bell pepper (i used a yellow one)
2 cups of spinach
1 tsp garlic, minced
1 tblspn olive oil
salt and pepper
instructions
1. Roast your bell pepper. You must have a gas stove, or else I don't really know what else to tell you except google "electric stove, roasting bell peppers". Place your bell pepper on the stove, heat high. Let each side char and rotate until all sides are charred. It should look something like this.
Also, use metal tongs. You don't want to melt your plastic ones.
2. Place your piping hot pepper into a small bowl and place a dish towel over it to let it steam itself. This will help make removing the skin easier.
3. While the pepper is cooling, saute your spinach and garlic together in some olive oil.
4. Once the pepper has cooled enough to handle (5-10 minutes), you should be able to easily rub off the skin. If you can't well, then you didn't char it enough now did you? Don't worry about not being able to remove all the charred bits. As tempting as it might be, DO NOT RUN THE PEPPER UNDER THE SINK. You'll wash away the flavor.
4. Once its nicely peeled, jullianne the pepper.
5. Preheat your oven to 425F (or what ever the pizza box calls for)
6. While your oven preheats, decorate your pizza with your veggie ingredients
7. Bake as instructed, plus 5-10 minutes depending on your pizza size.
8. Let cool, then cut and serve! Remember, hot cheese is taste bud searing cheese.
Serves as many people as the pizza size you bought.
Monday, March 8, 2010
Spinach Pasta Noodles with Wilted Spinach, Garlic and Cubed Chicken
Ahhh, the core GCC coursework is done, done and done! Congrats to all my fellow 1st years at Rush!! So what’s a girl to do with all this so called spare time? Okay, maybe not really because I still have a couple of papers and 3 exams to study for… but come on now, a little mental breather is well deserved!
I bought a 1 lbs bag of baby spinach this past weekend. If you’ve never seen 1 lb bags of spinach, well it’s A LOT. Eating it raw is the best way, but that’s also a lot of spinach to eat. Why not into some pasta form? Over all, this is a super easy recipe if you just go with the spinach/garlic/chicken part to top off some noodles, but if you really want to go for it, it doesn’t take much time at all for super fresh pasta. Pasta making from start to finish takes me about 1-1 ¼ hrs, resting time included.
Why butterflied chicken breast you may ask? Mainly because it just cooks faster. MUCH faster.
Also- this doesn't really make a "sauce" soooo you might want to have a jar of alfredo on the side.
The last time I made spinach pasta, or attempted to I should say, was in Santa Barbara at my Ladera house. Ah, what a nightmare. I still think that my pasta roller was possibly one of the best kitchen investments I’ve ever made.
Spinach Pasta Noodles with Wilted Spinach, Garlic and Cubed Chicken
ingredients For spinach pasta noodles:
2 cups fresh baby spinach
.25 c water
1 tsp salt
2 eggs
1 tblspn olive oil
2-3 c AP flour
ingredients For Spinach and garlic pasta sauté with cubed chicken
1 cup fresh spinach
2 or 3 cloves of fresh garlic minced
1 tblsn olive oil
2 chicken breasts, butterflied
pecorino romano or parmesan for topping
instructions: Pasta Noodles
1. in a pan, sauté baby spinach in the water and salt until cooked down and tender
2. let cool down, transfer into a blender and mix in egg
3. in your Kitchen Aid mixer bowl, make a well of flour with 2.25 c flour.
4. Pour in spinach/egg mixture into the well, add 1 tblspn olive oil
5. Mix on medium until dough forms
6. If the ball forms but feels sticky, add flour until the dough isn’t sticky anymore
7. Let rest for 15-30 minutes
8. Roll out into desired pasta noodle size (this time I went with a pappardelle)
9. Boil in a large pot of boiling salted water until al dente (2-3 minutes)
Makes about 1 lbs pasta
instructions: Spinach, garlic and Chicken
1. In a large pan, heat olive oil, sear chicken breast until about 2/3 of the way cooked through
2. Remove from pan, let rest 1-2 minutes then cube
3. Return pan to stove, on medium high heat, sauté together cubed chicken and garlic.
4. Once chicken has heated all the way through, toss in spinach and sauté until wilted
5. Put sauté mixture on top of noodles, or alternatively toss into noodles.
6. Top of with cheese
Makes enough for 4 servings, ish.
Sunday, March 7, 2010
Cornbread in a Cast Iron Skillet
In tune with yesterday’s recipe, Lamb Chili, what is consuming chili without cornbread? During the Grad College Ski trip a few weeks ago, Kwang O. made an amazing cast iron skillet cornbread. It was sweet and had the whole kernels of corn incorporated into it. It just made it a great way to start off breakfast and a great snack to scarf after an afternoon of snowboarding & skiing. And of course, anything cooked in a cast iron skillet is generally pretty tasty.
The versatility of my cast iron skillet continues from stove top to oven! Why not just use a regular baking pan? Of course, sure, you can use a regular baking pan. After all, not everyone has a cast iron skillet. The idea of using your cast iron skillet is by baking the bread in a preheated pan, you’ll get that nice, crisp golden brown crust that most of us are accustomed to when it comes to having cornbread. When you pour the batter into that preheated pan, its going to make the most beautiful sizzling and bubbling noise.
The corn kernels add a nice element of surprise as you bite into the bread… a little pop of moisture and surge of sweetness (depending on the type of corn kernels you bought). Definitely to be enjoyed with Lamb Chili.
If you aren’t going to use the cast iron, you can just use a regular 9” round cake pan, just omit the "preheat your pan" step, but do remember to grease it, unless you are using nonstick.
Cornbread in a Cast Iron Skillet
ingredients
1 c cornmeal
1 c milk
1 tblspn fresh lemon juice
NOTE: If you happen to have some buttermilk laying around, use that instead of the milk+ lemon juice)
1 tblspn vegetable oil or bacon fat (for greasing)
1 stick butter
.66 c white sugar
2 eggs
1 c AP flour, unsifted
.5 tsp salt
.5 tsp baking soda
1 c corn kernels (frozen or drained from a can)
instructions
1. Mix together milk and lemon juice, let stand for 5 minutes.
2. Pour on to corn meal, mix and let soak as you prepare the rest of the recipe
3. Preheat oven to 375F, grease a 8” or 9” cast iron skillet with vegetable oil or bacon fat (I used bacon fat)
4. Place the cast iron skillet into the oven to let it heat up
5. On the stove, melt the stick of butter on medium heat.
6. While the butter is melting, in another bowl mix together the flour, salt and baking soda.
7. Remove from heat and beat in sugar and eggs.
8. Mix in the cornmeal/milk mixture and the rest of the dry ingredients
9. Mix in the corn kernels
10. Remove cast iron skillet from the oven and pour mixture into the pan. Be careful! Cast iron pan = hot!
11. Bake at 375F for 40-55 minutes, until cake tester comes out clean.
Makes 6 nice sized wedges.
Subscribe to:
Posts (Atom)
