As some of you may or may not know, I have the most insatiable love for breakfast foods. The only exception would be pancakes. I abhor pancakes. One bite and I am so done.
Another fun fact about me, I used to work for a breakfast deli, both as The Coffee Girl (yeah, thats right, I walked around pouring coffee and bussing tables) and then somehow got sucked into being the occasional Kitchen Staff. There, I perfected the art of buttering toast, plating out food, and scrambling eggs (yes, all of the above really IS an art). If you've never heard of Herb's Deli and you're from Southeastern CT, you ought to try it at some point or another. Delightful breakfast food and personally, I really like the corned beef, which Herb makes in house. Tasty.
Lately, I've been loving The Sandwich. Last night, I made a tasty seared open face skirt steak sandwich, where the sauteed mushroom and caramelized onions came from. So this recipe is more about perfecting the art of making the perfect scrambled eggs for your sandwich. Anyone can put together a breakfast sandwich, but what truly makes a good breakfast sandwich is the egg you have as the protein. So I won't tell you how to put your english in the toaster (also, english muffins take a long time to toast, so to get a nice golden toast, put your toaster on high) or how to saute your mushrooms or how to make the onions, but instead focus on the eggs. If you do this right, you really don't need more then one egg per sandwich but since this wouldn't be filling enough for me, I always scramble two.
Perfectly Scrambled Eggs
ingredients
olive oil
2 eggs
1 tblspn milk
1. Prepare your pan. In a heavy, non stick pan turn the heat on high and put in enough olive oil to coat the bottom
2. In a medium bowl, crack two eggs and add the milk. beat the eggs with a fork. I mean, BEAT THE EGGS. beat the eggs until when you lift the mixture with the fork, there isn't this eggy dangling mixture from your fork
3. check your pan, is it hot enough? you can always test by putting a drop of egg on the pan and if it cooks right away, then your pan is ready. turn the heat down to medium high
4. with your Non Dominant Hand, hold your bowl with the egg mixture. In the other, the fork.
5. Pour the mixture into the middle of the pan, and as you pour, with your fork, move in a circular direction
6. the eggs should be instantly cooking and as you move in a circle, it should allow more even cooking. As the eggs cook, I like to lift folds of cooked egg and let liquid egg flow underneath.
7. Just before it seems that everything is cooked all the way, TURN OFF THE HEAT. The residual heat from the pan will cook the eggs the rest of the way.
8. You'll note that you might not have pieces of eggs but instead one huge scrambled egg. You can scramble, scramble it but I always find it easier to eat (in a sandwich) as one piece of scrambled egg.
9. If you did it right, you're volume should be pretty big, and you'll only need half of what is in your pan to fit on the english.
nom nom nom.
Showing posts with label great as a left over. Show all posts
Showing posts with label great as a left over. Show all posts
Friday, May 21, 2010

Wednesday, March 17, 2010
Magical Veggie Pizza
Oh, how I have been craving a perfect slice of NY cheese pizza the size of my head. Unfortunately, once you head west and end up in Chicago, well you get something called "deep dish", which to me is more like pizza casserole and indigestion.
Anyhow, I'm headed off to spring break in mere days and have to consume what ever produce I have left, ASAP so I've been making veggie everything. Okay- so I've only tried to make pizza once before, a long long time ago and I remember it coming out distinctly terrible. Besides, with this business of studying, I really don't have time to make/roll out the dough nor do I own a pizza stone. SHORT CUT: BUY A FROZEN CHEESE PIZZA!!! So for $3.99 at Trader Joe's I bought myself a frozen pizza. But how to piazza it up?? Simple additions of some veggies here and there and voila, 8 dollars later, you've got yourself a pretty much organic veggie pizza of magical proportions. I'd say it straddles the line of homemade if you ask me!
I roasted the pepper (instructions to follow), sauteed the spinach in lots of garlic, sliced up a tomato and and mushrooms, followed baking instructions plus 5 minutes and voila, 20 minutes later, pizzzzaaa!!!
If you are like me and pretty much cook for yourself or don't have a well stocked fridge, I'd raid either the salad bar or loose veggies section to get your veggies to sprinkle on top.
Magical Veggie Pizza
ingredients
1 frozen pizza
1 on the vine ripe tomato (sliced, quartered or halved)
3 crimini mushrooms, sliced
1 bell pepper (i used a yellow one)
2 cups of spinach
1 tsp garlic, minced
1 tblspn olive oil
salt and pepper
instructions
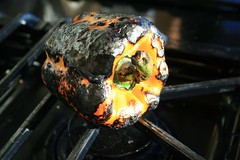
1. Roast your bell pepper. You must have a gas stove, or else I don't really know what else to tell you except google "electric stove, roasting bell peppers". Place your bell pepper on the stove, heat high. Let each side char and rotate until all sides are charred. It should look something like this.

Also, use metal tongs. You don't want to melt your plastic ones.
2. Place your piping hot pepper into a small bowl and place a dish towel over it to let it steam itself. This will help make removing the skin easier.
3. While the pepper is cooling, saute your spinach and garlic together in some olive oil.
4. Once the pepper has cooled enough to handle (5-10 minutes), you should be able to easily rub off the skin. If you can't well, then you didn't char it enough now did you? Don't worry about not being able to remove all the charred bits. As tempting as it might be, DO NOT RUN THE PEPPER UNDER THE SINK. You'll wash away the flavor.
4. Once its nicely peeled, jullianne the pepper.
5. Preheat your oven to 425F (or what ever the pizza box calls for)
6. While your oven preheats, decorate your pizza with your veggie ingredients
7. Bake as instructed, plus 5-10 minutes depending on your pizza size.
8. Let cool, then cut and serve! Remember, hot cheese is taste bud searing cheese.
Serves as many people as the pizza size you bought.

Anyhow, I'm headed off to spring break in mere days and have to consume what ever produce I have left, ASAP so I've been making veggie everything. Okay- so I've only tried to make pizza once before, a long long time ago and I remember it coming out distinctly terrible. Besides, with this business of studying, I really don't have time to make/roll out the dough nor do I own a pizza stone. SHORT CUT: BUY A FROZEN CHEESE PIZZA!!! So for $3.99 at Trader Joe's I bought myself a frozen pizza. But how to piazza it up?? Simple additions of some veggies here and there and voila, 8 dollars later, you've got yourself a pretty much organic veggie pizza of magical proportions. I'd say it straddles the line of homemade if you ask me!
I roasted the pepper (instructions to follow), sauteed the spinach in lots of garlic, sliced up a tomato and and mushrooms, followed baking instructions plus 5 minutes and voila, 20 minutes later, pizzzzaaa!!!
If you are like me and pretty much cook for yourself or don't have a well stocked fridge, I'd raid either the salad bar or loose veggies section to get your veggies to sprinkle on top.
Magical Veggie Pizza
ingredients
1 frozen pizza
1 on the vine ripe tomato (sliced, quartered or halved)
3 crimini mushrooms, sliced
1 bell pepper (i used a yellow one)
2 cups of spinach
1 tsp garlic, minced
1 tblspn olive oil
salt and pepper
instructions
1. Roast your bell pepper. You must have a gas stove, or else I don't really know what else to tell you except google "electric stove, roasting bell peppers". Place your bell pepper on the stove, heat high. Let each side char and rotate until all sides are charred. It should look something like this.
Also, use metal tongs. You don't want to melt your plastic ones.
2. Place your piping hot pepper into a small bowl and place a dish towel over it to let it steam itself. This will help make removing the skin easier.
3. While the pepper is cooling, saute your spinach and garlic together in some olive oil.
4. Once the pepper has cooled enough to handle (5-10 minutes), you should be able to easily rub off the skin. If you can't well, then you didn't char it enough now did you? Don't worry about not being able to remove all the charred bits. As tempting as it might be, DO NOT RUN THE PEPPER UNDER THE SINK. You'll wash away the flavor.
4. Once its nicely peeled, jullianne the pepper.
5. Preheat your oven to 425F (or what ever the pizza box calls for)
6. While your oven preheats, decorate your pizza with your veggie ingredients
7. Bake as instructed, plus 5-10 minutes depending on your pizza size.
8. Let cool, then cut and serve! Remember, hot cheese is taste bud searing cheese.
Serves as many people as the pizza size you bought.
Monday, March 8, 2010
Spinach Pasta Noodles with Wilted Spinach, Garlic and Cubed Chicken
Ahhh, the core GCC coursework is done, done and done! Congrats to all my fellow 1st years at Rush!! So what’s a girl to do with all this so called spare time? Okay, maybe not really because I still have a couple of papers and 3 exams to study for… but come on now, a little mental breather is well deserved!
I bought a 1 lbs bag of baby spinach this past weekend. If you’ve never seen 1 lb bags of spinach, well it’s A LOT. Eating it raw is the best way, but that’s also a lot of spinach to eat. Why not into some pasta form? Over all, this is a super easy recipe if you just go with the spinach/garlic/chicken part to top off some noodles, but if you really want to go for it, it doesn’t take much time at all for super fresh pasta. Pasta making from start to finish takes me about 1-1 ¼ hrs, resting time included.
Why butterflied chicken breast you may ask? Mainly because it just cooks faster. MUCH faster.
Also- this doesn't really make a "sauce" soooo you might want to have a jar of alfredo on the side.
The last time I made spinach pasta, or attempted to I should say, was in Santa Barbara at my Ladera house. Ah, what a nightmare. I still think that my pasta roller was possibly one of the best kitchen investments I’ve ever made.
Spinach Pasta Noodles with Wilted Spinach, Garlic and Cubed Chicken
ingredients For spinach pasta noodles:
2 cups fresh baby spinach
.25 c water
1 tsp salt
2 eggs
1 tblspn olive oil
2-3 c AP flour
ingredients For Spinach and garlic pasta sauté with cubed chicken
1 cup fresh spinach
2 or 3 cloves of fresh garlic minced
1 tblsn olive oil
2 chicken breasts, butterflied
pecorino romano or parmesan for topping
instructions: Pasta Noodles
1. in a pan, sauté baby spinach in the water and salt until cooked down and tender
2. let cool down, transfer into a blender and mix in egg
3. in your Kitchen Aid mixer bowl, make a well of flour with 2.25 c flour.
4. Pour in spinach/egg mixture into the well, add 1 tblspn olive oil
5. Mix on medium until dough forms
6. If the ball forms but feels sticky, add flour until the dough isn’t sticky anymore
7. Let rest for 15-30 minutes
8. Roll out into desired pasta noodle size (this time I went with a pappardelle)
9. Boil in a large pot of boiling salted water until al dente (2-3 minutes)
Makes about 1 lbs pasta
instructions: Spinach, garlic and Chicken
1. In a large pan, heat olive oil, sear chicken breast until about 2/3 of the way cooked through
2. Remove from pan, let rest 1-2 minutes then cube
3. Return pan to stove, on medium high heat, sauté together cubed chicken and garlic.
4. Once chicken has heated all the way through, toss in spinach and sauté until wilted
5. Put sauté mixture on top of noodles, or alternatively toss into noodles.
6. Top of with cheese
Makes enough for 4 servings, ish.
Saturday, March 6, 2010
Lamb Chili
Chili... it's one of those strange comfort foods. One that I kind of really, really love. I've been craving it for some time now, especially when it's been cold out. Travis and Jen brought some turkey chili in the other day and it was soooo good!
On this weekends market adventure, ground lamb was on sale, so I picked some up and was thinking: what could I possibly do with all of this lamb? Put some in my wonton mixture and the rest...uhh.. duh! of course! MAKE CHILI.
So, this recipe I am about to post will fix my craving with gluttonous proportions (it makes at least 3 quarts of chili... or so it seems) that I am going to be eating this for what seems like the rest of the quarter.
A few things to note, I've been crazy for making Indian foods lately and at the international market bought BAGS of cumin, coriander, red chili powder, tumeric and garama marsala that are straight out of the motherlan India. Be aware of the red chili powder heat index and adjust accordingly. In the Whole Foods bulk spices section, they will tell you the heat index. The bag that I bought from the international market doesn't state the heat index but.... it is hotter then any other normal red chili powder. So. Be warned, this recipe is HOT.
Lamb Chili
ingredients
1-1.5 lbs ground lamb
1 tblspn oo
1 bell peppers (1 orange, 1 green), chopped
2 Serrano peppers, chopped
1 large yellow onion, chopped
2 tblspn minced garlic, divided
1.5- 2 tblspn cumin
1.5- 2 tblspn red chili powder
1 tblspn coriander
2 tsp red chili flakes
2 tblspn dark brown sugar
1.5 tblspn Worchester Sauce
1 cup chicken broth
1 15 oz can black beans
1 15 oz can white or red kidney beans
1 28 oz can of crushed tomato
Salt & Pepper to taste
1 tblspn bacon fat, optional
instructions
1. In a large, deep pan, heat the oil and brown the lamb with 1 tblspn garlic, lightly salt and pepper, until the lamb is about 2/3rds cooked through. Remove from pan. Also, try not to over stir the lamb while it browns to avoid getting little crumbles
2. Drain the fat back into the pan and reheat. Toss in onions, peppers, remaining garlic and sauté on medium high heat until brown. Lightly salt and pepper. Here is where you can add the optional bacon fat to sauté the vegetables in.
3. Add in spices, sugar, Worchester sauce, coating the vegetables well.
4. Return ground lamb into the pan, evenly distributing the lamb throughout the pan
5. Add in chicken broth, beans, and tomato sauce.
6. Simmer for 10-15 min, splatter shield on.
7. Taste the mixture and adjust spices, add salt and pepper as needed.
Makes about 2.5-3 quarts.
Wednesday, November 4, 2009
Thyme & Sage Brined Chicken
It's been nuts at school with some kind of exam going on every week. Last week was terrible, having two huge midterms (I will miss you S.P Kwan), I had nothing but time for books and eating at the hospital's Au Bon Pain and Trader Joe's rice and bean burritos. I can easily say that I hope I don't have to do a marathon of eating ABP for a while... and by a while, I bet it will happen in about 3 or 4 weeks when we begin to prepare for finals. TJ's rice and bean burritos, I am still a fan... I do have to try and get there sometime soon and restock my supply though.
So in the craziness of midterms, I haven't been able to properly feed myself. Sunday, Jen F. took me on an excursion to "The Burbs". We went to Skokie and to the most amazing asian grocery store ever! It was huge! Aisle of rice noodles, an entire corner devoted to all sorts of kim chee, and rice cookers! Asian pears are in season, so I stock piled.
I bought a plethora of produce, chicken, and other asian yummies that I wouldn't have been able to get elsewhere (I sense me trying to create Bun Bo in the near future....) So thank you Jen F. for a fun Sunday and the most ultimate grocery experience! I feel whole again, with a fully stocked fridge and a fruit box full of bananas, asian pears, apples and a pineapple.
Since I am at RUMC at least 10 hours a day (sadly, I am not exaggerating), it's hard to come up with something that is quick and easy. So when I get back home at 8 or 9 or 10 at night, I really want to be able to put something together and have something halfway decent. This AM I got up early enough to package away all the chicken I bought and thought to myself, "Well, if I can brine turkey, why not chicken?" and that is how it led to this great creation that I let brine all day long while I was at RUMC, came home, tossed some veggies into a pan and let bake! Most of these roasted chicken recipes call for some kind of starch element, such as potatoes. I had yucca root on hand, and used at as my starch instead of the usual Yukon gold. I also tossed in an apple. The apple added the slightest bit of sweetness and lots of moisture. Has anyone noticed a trend? I like to add apples to savory things.
Brining the chicken yields an amazingly moist and tender chicken packed with flavor and a near "melt in your mouth" delightfulness. Your brining ratio is up to you, depending on how salty you want your end result to be.
I've also like to make a note that I've gotten MUCH better at proportions. This recipe is made for about 2 servings (Lisa sized of course!) so I had some for dinner, and will be toting the rest tomorrow with me for lunch. Yum!
Thyme and Sage Brined Chicken
ingredients
for the brine:
2 tblspn salt
1.5 c water
2 tsp chopped thyme
5 sage leaves coarsely chopped
.25 c chopped red onion
1 chicken quarter, cut into drumstick and two parts
For the roasted veggies:
.5 c yucca, 1 inch cubes
1 apple, 1 inch cubes
.5 yellow bell pepper, cubed
.33 red onion, cubed
1 tomato, wedged and cut in half
3 cloves garlic, coarsely chopped
2 tsp sea salt
fresh cracked pepper
2 tablespoon olive oil
instructions
1. In a 1 quart zip lock bag, mix all brine ingredients together and shake well, making sure the salt is dissolved.
2. If you have a particularly muscular chicken leg, I highly suggest cutting down the drumstick and slightly pulling the meat away from the bone, sort of like if you were to butterfly a chicken breast.
3. Add the chicken to the zip lock bag.
4. Let brine all day in the fridge (I assume you can let it brine for 1 hr minimally, but I wouldn't know.. my chicken sat in brine from 815AM until 730PM)
(time elapses to dinner time)
5. Preheat oven to 450F
6. Toss all veggies and garlic in olive oil and S&P.
7. Place in a small pan
8. Remove chicken from zip lock bag, rinse in the sink
9. place skin side down onto your veggies
10. Cover in foil and bake for about 20 minutes
11. Flip over chicken, so it is skin side up. Cover again in foil and bake for an additional 15 minutes.
12. Remove foil, turn on the broiler to high to golden up the skin.
13. Consume!!!
yields 2 Lisa sized portions OR if you are some hungry dude, I am sure you could eat the whole thing. After all, it's only a quarter of a chicken.
Friday, October 23, 2009
Bison Stir Fry over Brown Jasmine Rice
Back home in Connecticut, somewhere between Buttonwoods Farm (best ice cream EVER) and my house, there is a Bison Farm. All summer long Andrea, Vaughn and I discussed doing from scratch, homemade burgers (condiments & buns included) and using Bison as the protein. But before I knew it, summer came and went and I was packed to the brim in my little Corolla and making my way to the Windy City! Our homemade burger endeavors never came to fruition. Bummer.
I'm also not going to lie when I say I've been wanting to try bison for quite sometime. It's a red protein and it has less fat, calories and cholesterol then chicken! I've had just about everything else: rabbit, venison, veal, quail, squab, ducks, turkeys, what ever, but the Bison! It's eluded me FOREVER.
So I thought I was going to get to fulfill the dream of having Bison when I was in Colorado. For some reason, I was under the impression that there was a bounty of Bison everywhere! And that when I got to either Boulder or Breckenridge, I would be stuffing my face in a nice, delightful, tasty, Bison Burger. That was a Fail alright!
Christel was like "Lisa I don't know why you thought that there would be Bison here." I don't know either Christ, I sure don't.
Anyhow, with a craving for red meat, on the hunt for some quality beef, I stumbled across this fridge full of South Dakota Bison at the local Whole Foods. The stars aligned just right and that was it. It was love. Today was the day. I was finally going to have some Bison.
I did an overnight marinate of soy sauce, hoisin sauce, garlic, chopped basil, brown sugar, agave nectar, chili flakes, shallots, splash of red wine vinegar and olive oil.
Then with a myriad of veggies: mushrooms, carrots, broccoli, red onion, & red bell peppers, I sauteed them up in olive oil, garlic, crushed fresh ginger, and a splash more of soy sauce (salt and fresh cracked pepper to taste of course).
Over all success: I'd rate pretty high. It's hard to screw up a stir fry... unless the Salt Lady came and fell right into your dish... but thankfully, that didn't happen! Bison itself, if you gave me beef stir fry or bison, I wouldn't have known the difference. Next time, I am going to have to try to just as it, grilled with some sea salt and cracked pepper.
Subscribe to:
Posts (Atom)
