As some of you may or may not know, I have the most insatiable love for breakfast foods. The only exception would be pancakes. I abhor pancakes. One bite and I am so done.
Another fun fact about me, I used to work for a breakfast deli, both as The Coffee Girl (yeah, thats right, I walked around pouring coffee and bussing tables) and then somehow got sucked into being the occasional Kitchen Staff. There, I perfected the art of buttering toast, plating out food, and scrambling eggs (yes, all of the above really IS an art). If you've never heard of Herb's Deli and you're from Southeastern CT, you ought to try it at some point or another. Delightful breakfast food and personally, I really like the corned beef, which Herb makes in house. Tasty.
Lately, I've been loving The Sandwich. Last night, I made a tasty seared open face skirt steak sandwich, where the sauteed mushroom and caramelized onions came from. So this recipe is more about perfecting the art of making the perfect scrambled eggs for your sandwich. Anyone can put together a breakfast sandwich, but what truly makes a good breakfast sandwich is the egg you have as the protein. So I won't tell you how to put your english in the toaster (also, english muffins take a long time to toast, so to get a nice golden toast, put your toaster on high) or how to saute your mushrooms or how to make the onions, but instead focus on the eggs. If you do this right, you really don't need more then one egg per sandwich but since this wouldn't be filling enough for me, I always scramble two.
Perfectly Scrambled Eggs
ingredients
olive oil
2 eggs
1 tblspn milk
1. Prepare your pan. In a heavy, non stick pan turn the heat on high and put in enough olive oil to coat the bottom
2. In a medium bowl, crack two eggs and add the milk. beat the eggs with a fork. I mean, BEAT THE EGGS. beat the eggs until when you lift the mixture with the fork, there isn't this eggy dangling mixture from your fork
3. check your pan, is it hot enough? you can always test by putting a drop of egg on the pan and if it cooks right away, then your pan is ready. turn the heat down to medium high
4. with your Non Dominant Hand, hold your bowl with the egg mixture. In the other, the fork.
5. Pour the mixture into the middle of the pan, and as you pour, with your fork, move in a circular direction
6. the eggs should be instantly cooking and as you move in a circle, it should allow more even cooking. As the eggs cook, I like to lift folds of cooked egg and let liquid egg flow underneath.
7. Just before it seems that everything is cooked all the way, TURN OFF THE HEAT. The residual heat from the pan will cook the eggs the rest of the way.
8. You'll note that you might not have pieces of eggs but instead one huge scrambled egg. You can scramble, scramble it but I always find it easier to eat (in a sandwich) as one piece of scrambled egg.
9. If you did it right, you're volume should be pretty big, and you'll only need half of what is in your pan to fit on the english.
nom nom nom.
Showing posts with label vegetarian. Show all posts
Showing posts with label vegetarian. Show all posts
Friday, May 21, 2010


Wednesday, March 17, 2010
Magical Veggie Pizza
Oh, how I have been craving a perfect slice of NY cheese pizza the size of my head. Unfortunately, once you head west and end up in Chicago, well you get something called "deep dish", which to me is more like pizza casserole and indigestion.
Anyhow, I'm headed off to spring break in mere days and have to consume what ever produce I have left, ASAP so I've been making veggie everything. Okay- so I've only tried to make pizza once before, a long long time ago and I remember it coming out distinctly terrible. Besides, with this business of studying, I really don't have time to make/roll out the dough nor do I own a pizza stone. SHORT CUT: BUY A FROZEN CHEESE PIZZA!!! So for $3.99 at Trader Joe's I bought myself a frozen pizza. But how to piazza it up?? Simple additions of some veggies here and there and voila, 8 dollars later, you've got yourself a pretty much organic veggie pizza of magical proportions. I'd say it straddles the line of homemade if you ask me!
I roasted the pepper (instructions to follow), sauteed the spinach in lots of garlic, sliced up a tomato and and mushrooms, followed baking instructions plus 5 minutes and voila, 20 minutes later, pizzzzaaa!!!
If you are like me and pretty much cook for yourself or don't have a well stocked fridge, I'd raid either the salad bar or loose veggies section to get your veggies to sprinkle on top.
Magical Veggie Pizza
ingredients
1 frozen pizza
1 on the vine ripe tomato (sliced, quartered or halved)
3 crimini mushrooms, sliced
1 bell pepper (i used a yellow one)
2 cups of spinach
1 tsp garlic, minced
1 tblspn olive oil
salt and pepper
instructions
1. Roast your bell pepper. You must have a gas stove, or else I don't really know what else to tell you except google "electric stove, roasting bell peppers". Place your bell pepper on the stove, heat high. Let each side char and rotate until all sides are charred. It should look something like this.

Also, use metal tongs. You don't want to melt your plastic ones.
2. Place your piping hot pepper into a small bowl and place a dish towel over it to let it steam itself. This will help make removing the skin easier.
3. While the pepper is cooling, saute your spinach and garlic together in some olive oil.
4. Once the pepper has cooled enough to handle (5-10 minutes), you should be able to easily rub off the skin. If you can't well, then you didn't char it enough now did you? Don't worry about not being able to remove all the charred bits. As tempting as it might be, DO NOT RUN THE PEPPER UNDER THE SINK. You'll wash away the flavor.
4. Once its nicely peeled, jullianne the pepper.
5. Preheat your oven to 425F (or what ever the pizza box calls for)
6. While your oven preheats, decorate your pizza with your veggie ingredients
7. Bake as instructed, plus 5-10 minutes depending on your pizza size.
8. Let cool, then cut and serve! Remember, hot cheese is taste bud searing cheese.
Serves as many people as the pizza size you bought.

Anyhow, I'm headed off to spring break in mere days and have to consume what ever produce I have left, ASAP so I've been making veggie everything. Okay- so I've only tried to make pizza once before, a long long time ago and I remember it coming out distinctly terrible. Besides, with this business of studying, I really don't have time to make/roll out the dough nor do I own a pizza stone. SHORT CUT: BUY A FROZEN CHEESE PIZZA!!! So for $3.99 at Trader Joe's I bought myself a frozen pizza. But how to piazza it up?? Simple additions of some veggies here and there and voila, 8 dollars later, you've got yourself a pretty much organic veggie pizza of magical proportions. I'd say it straddles the line of homemade if you ask me!
I roasted the pepper (instructions to follow), sauteed the spinach in lots of garlic, sliced up a tomato and and mushrooms, followed baking instructions plus 5 minutes and voila, 20 minutes later, pizzzzaaa!!!
If you are like me and pretty much cook for yourself or don't have a well stocked fridge, I'd raid either the salad bar or loose veggies section to get your veggies to sprinkle on top.
Magical Veggie Pizza
ingredients
1 frozen pizza
1 on the vine ripe tomato (sliced, quartered or halved)
3 crimini mushrooms, sliced
1 bell pepper (i used a yellow one)
2 cups of spinach
1 tsp garlic, minced
1 tblspn olive oil
salt and pepper
instructions
1. Roast your bell pepper. You must have a gas stove, or else I don't really know what else to tell you except google "electric stove, roasting bell peppers". Place your bell pepper on the stove, heat high. Let each side char and rotate until all sides are charred. It should look something like this.
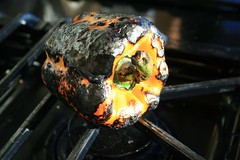
Also, use metal tongs. You don't want to melt your plastic ones.
2. Place your piping hot pepper into a small bowl and place a dish towel over it to let it steam itself. This will help make removing the skin easier.
3. While the pepper is cooling, saute your spinach and garlic together in some olive oil.
4. Once the pepper has cooled enough to handle (5-10 minutes), you should be able to easily rub off the skin. If you can't well, then you didn't char it enough now did you? Don't worry about not being able to remove all the charred bits. As tempting as it might be, DO NOT RUN THE PEPPER UNDER THE SINK. You'll wash away the flavor.
4. Once its nicely peeled, jullianne the pepper.
5. Preheat your oven to 425F (or what ever the pizza box calls for)
6. While your oven preheats, decorate your pizza with your veggie ingredients
7. Bake as instructed, plus 5-10 minutes depending on your pizza size.
8. Let cool, then cut and serve! Remember, hot cheese is taste bud searing cheese.
Serves as many people as the pizza size you bought.
Sunday, March 7, 2010
Cornbread in a Cast Iron Skillet
In tune with yesterday’s recipe, Lamb Chili, what is consuming chili without cornbread? During the Grad College Ski trip a few weeks ago, Kwang O. made an amazing cast iron skillet cornbread. It was sweet and had the whole kernels of corn incorporated into it. It just made it a great way to start off breakfast and a great snack to scarf after an afternoon of snowboarding & skiing. And of course, anything cooked in a cast iron skillet is generally pretty tasty.
The versatility of my cast iron skillet continues from stove top to oven! Why not just use a regular baking pan? Of course, sure, you can use a regular baking pan. After all, not everyone has a cast iron skillet. The idea of using your cast iron skillet is by baking the bread in a preheated pan, you’ll get that nice, crisp golden brown crust that most of us are accustomed to when it comes to having cornbread. When you pour the batter into that preheated pan, its going to make the most beautiful sizzling and bubbling noise.
The corn kernels add a nice element of surprise as you bite into the bread… a little pop of moisture and surge of sweetness (depending on the type of corn kernels you bought). Definitely to be enjoyed with Lamb Chili.
If you aren’t going to use the cast iron, you can just use a regular 9” round cake pan, just omit the "preheat your pan" step, but do remember to grease it, unless you are using nonstick.
Cornbread in a Cast Iron Skillet
ingredients
1 c cornmeal
1 c milk
1 tblspn fresh lemon juice
NOTE: If you happen to have some buttermilk laying around, use that instead of the milk+ lemon juice)
1 tblspn vegetable oil or bacon fat (for greasing)
1 stick butter
.66 c white sugar
2 eggs
1 c AP flour, unsifted
.5 tsp salt
.5 tsp baking soda
1 c corn kernels (frozen or drained from a can)
instructions
1. Mix together milk and lemon juice, let stand for 5 minutes.
2. Pour on to corn meal, mix and let soak as you prepare the rest of the recipe
3. Preheat oven to 375F, grease a 8” or 9” cast iron skillet with vegetable oil or bacon fat (I used bacon fat)
4. Place the cast iron skillet into the oven to let it heat up
5. On the stove, melt the stick of butter on medium heat.
6. While the butter is melting, in another bowl mix together the flour, salt and baking soda.
7. Remove from heat and beat in sugar and eggs.
8. Mix in the cornmeal/milk mixture and the rest of the dry ingredients
9. Mix in the corn kernels
10. Remove cast iron skillet from the oven and pour mixture into the pan. Be careful! Cast iron pan = hot!
11. Bake at 375F for 40-55 minutes, until cake tester comes out clean.
Makes 6 nice sized wedges.

The versatility of my cast iron skillet continues from stove top to oven! Why not just use a regular baking pan? Of course, sure, you can use a regular baking pan. After all, not everyone has a cast iron skillet. The idea of using your cast iron skillet is by baking the bread in a preheated pan, you’ll get that nice, crisp golden brown crust that most of us are accustomed to when it comes to having cornbread. When you pour the batter into that preheated pan, its going to make the most beautiful sizzling and bubbling noise.
The corn kernels add a nice element of surprise as you bite into the bread… a little pop of moisture and surge of sweetness (depending on the type of corn kernels you bought). Definitely to be enjoyed with Lamb Chili.
If you aren’t going to use the cast iron, you can just use a regular 9” round cake pan, just omit the "preheat your pan" step, but do remember to grease it, unless you are using nonstick.
Cornbread in a Cast Iron Skillet
ingredients
1 c cornmeal
1 c milk
1 tblspn fresh lemon juice
NOTE: If you happen to have some buttermilk laying around, use that instead of the milk+ lemon juice)
1 tblspn vegetable oil or bacon fat (for greasing)
1 stick butter
.66 c white sugar
2 eggs
1 c AP flour, unsifted
.5 tsp salt
.5 tsp baking soda
1 c corn kernels (frozen or drained from a can)
instructions
1. Mix together milk and lemon juice, let stand for 5 minutes.
2. Pour on to corn meal, mix and let soak as you prepare the rest of the recipe
3. Preheat oven to 375F, grease a 8” or 9” cast iron skillet with vegetable oil or bacon fat (I used bacon fat)
4. Place the cast iron skillet into the oven to let it heat up
5. On the stove, melt the stick of butter on medium heat.
6. While the butter is melting, in another bowl mix together the flour, salt and baking soda.
7. Remove from heat and beat in sugar and eggs.
8. Mix in the cornmeal/milk mixture and the rest of the dry ingredients
9. Mix in the corn kernels
10. Remove cast iron skillet from the oven and pour mixture into the pan. Be careful! Cast iron pan = hot!
11. Bake at 375F for 40-55 minutes, until cake tester comes out clean.
Makes 6 nice sized wedges.
Tuesday, January 12, 2010
Beet & Sunchoke Salad with Balsamic Pomegranate Vinagrette
I’ve got a current obsession: Beets, Pomegranates & Sunchokes. All three are super tasty and yummy. As we all know, the darker the veggie or fruit, the higher the nutritional value. Beets and poms are well known to be super foods, high in vitamins and antioxidant power.
Fun fact about pomegranates: all poms have the same number of seeds in them. Okay, I really don’t know how true that is. I read it on the Trader Joe’s Elevator Chalkboard. Sunchokes? Now what are sunchokes. Technically, the are known as one of two things: California Sunchokes OR Jeruselum Artichokes. Now you are thinking, oh! Green! Large and sort of acorn shaped! Wrong!! It’s actually a tubar. The closest thing I can think of that it resembles would be ginger root.
Light tan in color, when peeled, yields a beautiful white flesh. It’s got the texture of a water chestnut, with a slightly nutty and artichoke flavor. Raw or cooked, its delicious with a lot of nutritional value- which I find surprising considering how it is just a white root- the polar opposite of the beet.
So what do I get when I get creative (okay, not really that creative)? A balsamic pomegranate vinaigrette drizzled over a pile of beet slices, juliened carrots, shredded red cabbage, a sprinkle of pomegranate seeds and topped off with sunchoke slices. Of course no salad is truly complete without some kind of cheese right? Currently also obsessed with Cypress Grove Farm , I had topped off the salad stack with shavings of “Midnight Moon”, which is their hard goat cheese. This hard goat cheese has little bits of lactic acid crystallization, which adds an amazing crunch and amazing flavor and texture to the salad.
The mixture of the goat cheese, tangy yet sweet balsamic pom vinagrette and the crunch of all those root vegetables, ohhhh yumm!!! I couldn’t feel any healthier. For photo sake, I sort of plated the salad as a stack but feel free to turn it into a chop salad and toss all together. You can bet that’s how I prepped my lunch salad for tomorrow.
NOTE that for how much I have as “ingredients” is really up to you, how ever much salad you want to make up. Dressing-wise, the recipe I am putting up makes enough for about 2 salads.
ALSO NOTE: If you really don’t have access to a fresh pom, or don’t want to bother with the seeds, you can easily use Pom juice, just using a 3:2 ratio of balsamic to pom juice, rather then the 1:1 because the Pom juice is concentrated.
ingredients
1 small beet, peeled
1 carrot, peeled & sliced into O’s (or jullianed)
1 large California Sunchoke
.33 c shredded red cabbage
.75 c. pomegranate seeds, divided into .5 c & .25 c
3 tblspn balsamic vinegar
3 tblspn olive oil
pinch of salt
pinch of pepper
instructions
1. taking the .5 c of pom seeds, in a small bowl, crush the seeds to get the juice. I found that the seeds put in a small bowl, crushed with the bottom of a pint glass worked best.
2. In a small sauce pan, put in the vinegar and about 3 tablespoons of pom juice and simmer until slightly reduced, let cool.
3. While your balsamic pom is cooling, arrange your veggies how you want.
4. Once the balsamic pom is cooled, emulsify (or whisk together) with the olive oil, salt and pepper.
5. Toss desired amount onto your salad.
6. Sprinkle on the cheese.
7. Yum!

Fun fact about pomegranates: all poms have the same number of seeds in them. Okay, I really don’t know how true that is. I read it on the Trader Joe’s Elevator Chalkboard. Sunchokes? Now what are sunchokes. Technically, the are known as one of two things: California Sunchokes OR Jeruselum Artichokes. Now you are thinking, oh! Green! Large and sort of acorn shaped! Wrong!! It’s actually a tubar. The closest thing I can think of that it resembles would be ginger root.
Light tan in color, when peeled, yields a beautiful white flesh. It’s got the texture of a water chestnut, with a slightly nutty and artichoke flavor. Raw or cooked, its delicious with a lot of nutritional value- which I find surprising considering how it is just a white root- the polar opposite of the beet.
So what do I get when I get creative (okay, not really that creative)? A balsamic pomegranate vinaigrette drizzled over a pile of beet slices, juliened carrots, shredded red cabbage, a sprinkle of pomegranate seeds and topped off with sunchoke slices. Of course no salad is truly complete without some kind of cheese right? Currently also obsessed with Cypress Grove Farm , I had topped off the salad stack with shavings of “Midnight Moon”, which is their hard goat cheese. This hard goat cheese has little bits of lactic acid crystallization, which adds an amazing crunch and amazing flavor and texture to the salad.
The mixture of the goat cheese, tangy yet sweet balsamic pom vinagrette and the crunch of all those root vegetables, ohhhh yumm!!! I couldn’t feel any healthier. For photo sake, I sort of plated the salad as a stack but feel free to turn it into a chop salad and toss all together. You can bet that’s how I prepped my lunch salad for tomorrow.
NOTE that for how much I have as “ingredients” is really up to you, how ever much salad you want to make up. Dressing-wise, the recipe I am putting up makes enough for about 2 salads.
ALSO NOTE: If you really don’t have access to a fresh pom, or don’t want to bother with the seeds, you can easily use Pom juice, just using a 3:2 ratio of balsamic to pom juice, rather then the 1:1 because the Pom juice is concentrated.
ingredients
1 small beet, peeled
1 carrot, peeled & sliced into O’s (or jullianed)
1 large California Sunchoke
.33 c shredded red cabbage
.75 c. pomegranate seeds, divided into .5 c & .25 c
3 tblspn balsamic vinegar
3 tblspn olive oil
pinch of salt
pinch of pepper
instructions
1. taking the .5 c of pom seeds, in a small bowl, crush the seeds to get the juice. I found that the seeds put in a small bowl, crushed with the bottom of a pint glass worked best.
2. In a small sauce pan, put in the vinegar and about 3 tablespoons of pom juice and simmer until slightly reduced, let cool.
3. While your balsamic pom is cooling, arrange your veggies how you want.
4. Once the balsamic pom is cooled, emulsify (or whisk together) with the olive oil, salt and pepper.
5. Toss desired amount onto your salad.
6. Sprinkle on the cheese.
7. Yum!
Friday, August 14, 2009
Mango Salsa
Wow! Amazing! Me blogging two recipes in one week? Absolutely unheard of!
One of the perks of my job is [generally] every Tuesday during the summer, the Muttart's put on Taco Tuesday. It's a great summer time activity that gets all the girls together along with Jeff and Matt (poor guys!) for lots of laughs and really good turkey tacos.
A food I developed quite the love for while living in Santa Barbara, CA was Mango Salsa. It seems to me that it is a lot less common salsa concoction here in the Northeast. One Taco Tuesday, I thought to myself, hmmm... why don't I make some? And so I did! It turned out to be quite the success with pretty positive feedback :]
Although it is a salsa with fruit in it, it is not a fruity salsa by any means. In all actuality the mango adds a nice distinct yet subtle flavor and texture to the salsa, but it is still very salsa-ey and not a sweet tasting salsa by any means. I used jalapeño peppers in this salsa. If you ever wonder how to determine the "hotness" of a jalapeño pepper, this is a great method . Scientifically proven? No... but a genius culinary trick? Definitely.
Current photo of the salsa was two days after I made it, when I brought the extra to Amos Lake for us to enjoy on the boat while we took turns on the seadoo and wakeboard. Not going to lie when I say it was even better two days after I made it.
The recipe I am posting makes A LOT of salsa so you might want to consider halving the recipe. It also keeps for about 3-4 days before it gets mushy and gross. In general, I would say this is a simple and easy to make recipe. Perfect snack food for the summer!
Mango Salsa
ingredients
2 Mexican mango, ripe but not mushy
1 (colorful) bell pepper
1/2 red onion
1 cucumber (or 2 pickling cucumbers)
1 jalapeño, seeds and pith removed
1/4 cup chopped cilantro
1.5 tbs apple cider vinegar
1 lime (about 1.5-2 tbs of lime juice)
1 tspn fresh black pepper
1 tspn kosher salt
materials
knife
cutting board
bowl
1. peel the mangos. Cut into slices about 1/4 inches and dice.
2. dice bell pepper, red onion and cucumber. With the cucumber, you can leave the skin on or off. I prefer to leave the skin on as it adds a nice bit of textural element to the salsa.
3. mince the jalapeño. Don't touch your eyes! it might burn.
4. toss all the vegetables together along with the cilantro.
5. juice the lime right on top of the mixture followed by the vinegar, salt and pepper.
6. toss together until well mixed.
7. let flavors meld together for at least 30-45 minutes. The longer the mixture sits together, the more the flavors will develop.
makes about 3 cups? Just a guesstimate

One of the perks of my job is [generally] every Tuesday during the summer, the Muttart's put on Taco Tuesday. It's a great summer time activity that gets all the girls together along with Jeff and Matt (poor guys!) for lots of laughs and really good turkey tacos.
A food I developed quite the love for while living in Santa Barbara, CA was Mango Salsa. It seems to me that it is a lot less common salsa concoction here in the Northeast. One Taco Tuesday, I thought to myself, hmmm... why don't I make some? And so I did! It turned out to be quite the success with pretty positive feedback :]
Although it is a salsa with fruit in it, it is not a fruity salsa by any means. In all actuality the mango adds a nice distinct yet subtle flavor and texture to the salsa, but it is still very salsa-ey and not a sweet tasting salsa by any means. I used jalapeño peppers in this salsa. If you ever wonder how to determine the "hotness" of a jalapeño pepper, this is a great method . Scientifically proven? No... but a genius culinary trick? Definitely.
Current photo of the salsa was two days after I made it, when I brought the extra to Amos Lake for us to enjoy on the boat while we took turns on the seadoo and wakeboard. Not going to lie when I say it was even better two days after I made it.
The recipe I am posting makes A LOT of salsa so you might want to consider halving the recipe. It also keeps for about 3-4 days before it gets mushy and gross. In general, I would say this is a simple and easy to make recipe. Perfect snack food for the summer!
Mango Salsa
ingredients
2 Mexican mango, ripe but not mushy
1 (colorful) bell pepper
1/2 red onion
1 cucumber (or 2 pickling cucumbers)
1 jalapeño, seeds and pith removed
1/4 cup chopped cilantro
1.5 tbs apple cider vinegar
1 lime (about 1.5-2 tbs of lime juice)
1 tspn fresh black pepper
1 tspn kosher salt
materials
knife
cutting board
bowl
1. peel the mangos. Cut into slices about 1/4 inches and dice.
2. dice bell pepper, red onion and cucumber. With the cucumber, you can leave the skin on or off. I prefer to leave the skin on as it adds a nice bit of textural element to the salsa.
3. mince the jalapeño. Don't touch your eyes! it might burn.
4. toss all the vegetables together along with the cilantro.
5. juice the lime right on top of the mixture followed by the vinegar, salt and pepper.
6. toss together until well mixed.
7. let flavors meld together for at least 30-45 minutes. The longer the mixture sits together, the more the flavors will develop.
makes about 3 cups? Just a guesstimate
Subscribe to:
Posts (Atom)
